Line25 is reader supported. At no cost to you a commission from sponsors may be earned when a purchase is made via links on the site. Learn more
So you have this really great idea for a blog or website, but you don’t really know where to start. You ask yourself “how do I start a blog?” and what platform do I choose for it? There are many options available in this day and age for starting a blog, and in this article we will discuss how to quickly and easily start a blog with WordPress.
There are blogs built with WordPress, Drupa, Joomla as well as plenty of websites built with website builders such as Wix, Weebly, Squarespace and others. In today’s guide, we will teach you how to start a blog using WordPress. Why WordPress you say? Well, for one – our very own blog, Line25, is proudly powered by WordPress. WordPress has been around for many years and has grown into a terrific and stable platform. Because it has been around for so long, there are also a number of WordPress plugins which you can take advantage of. Think of WordPress plug-ins as additional features for your blog. You can really customize your blog by taking advantage of all the various WP plugins that are available.
There are 2 ways to approach starting a website with WordPress, from a technical standpoint. You can first get your own domain and hosting, go to WordPress’s website and download WordPress, then follow the installation instructions. Or, a much easier way, is to take advantage of “quick-install” features available through select hosting providers. One such provider we will be using as an example today is HostGator. HostGator, like WordPress, has been around for many years and is one of the most popular shared hosting providers on the web. So let us look at how we can take advantage of HostGator’s quick-install feature for starting a blog with WordPress.
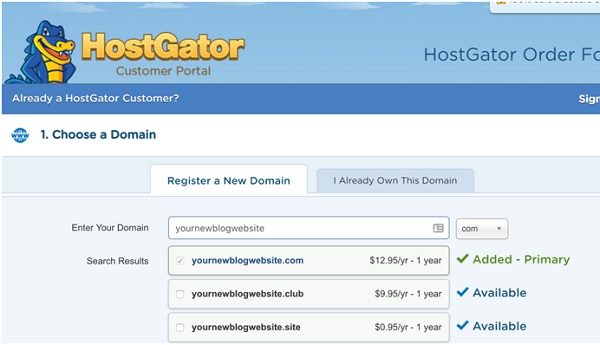
Of course if you haven’t done so already, first you need to get a domain. There are many domain registrars available so your options are very open. You can even register a domain directly from HostGator when you purchase your hosting for a completely hassle-free experience (see screen shot below). One thing you should not forget about is making sure your domain’s registration is private. If you register a domain and even temporarily keep your registration public, there are tens (if not hundreds) of websites who immediately get access to your registration information and publish it on their own websites. So it’s always best to start out with a private registration as soon as you register your domain.
Now let’s go ahead and walk through installing WordPress on HostGator. If you prefer to watch a video instead of reading instructions, you can do so here:
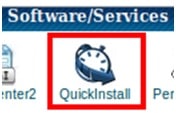
After you have purchased your hosting, you will get a welcome email from HostGator with your cPanel log in details. This is where you will be able to install WordPress using the “quick-install” feature that HostGator provides. Once you log in to cPanel, click on the Quick Install icon which looks like this:

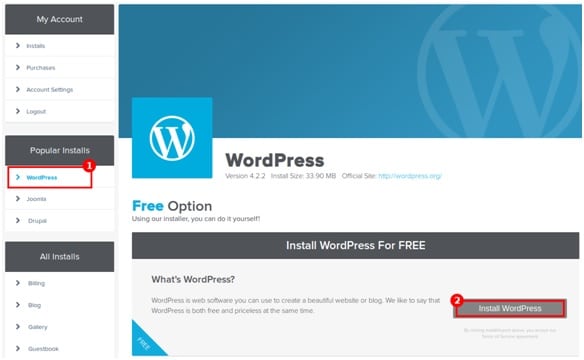
After you’ve clicked on Quick Install, you will be asked what kind of blogging software you want to install. As I mentioned earlier, there are various blogging platforms such as WordPress, Joomla and Drupal, but I strongly recommend for you to use WordPress over the other two. So go ahead and click on WordPress and then “Install WordPress”.
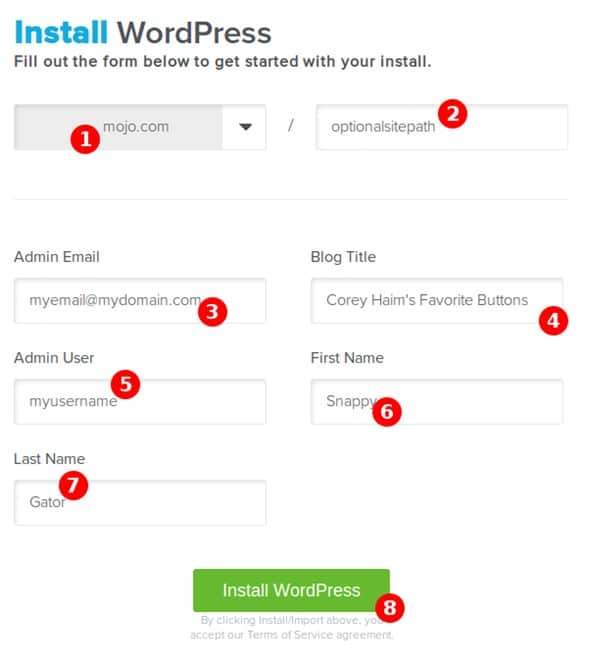
From here on, you will have to fill out your blog’s details, such as title, your email address and a few other bits of information, and then click on “Install WordPress”.
Let’s look at each field you have to fill out:
- Base domain of your WordPress blog (you probably wouldn’t need to change anything here)
- Sub-directory of your WordPress blog. I would only recommend a sub-directory if you plan to have a non-WordPress website as the main site and WordPress blog in a folder. Otherwise, don’t put anything in sub-directory.
- Admin email – here you’ll need to choose an admin email for your WordPress blog. This is where you’ll get all of your notifications from WordPress and it will also be used as the default contact email.
- Blog title – here you need to choose an appropriate title for your blog. On Line25 for example, we have chose “Line25: Web Design Blog” to describe exactly what our blog is about.
- Admin username – here you can choose a user name other than “admin” as your default admin user name. Picking something other than “admin” is more secure and is recommended.
- Your first and last name – these are pretty self-explanatory.
This is really it. Creating a blog with WordPress using the Quick Install options on hosting companies such as HostGator makes it as easy as possible to start a blog using WordPress. Simply follow the instructions outlined in this beginner’s tutorial on blog creation in WordPress and you will have your WordPress blog up and running in no time.


WordPress is the best CMS to create websites and I personally use it for all my online projects.
It’s not only easy to start a blog on WordPress, but it is also extremely easy to maintain it!
Thanks for the great guide!