Line25 is reader supported. At no cost to you a commission from sponsors may be earned when a purchase is made via links on the site. Learn more
Follow this overview of the build process to create your own custom WordPress theme. We’ll be taking my latest theme design from its basic HTML and CSS mockup and inserting the various WordPress template tags to build a fully working theme ready to install on your blog.
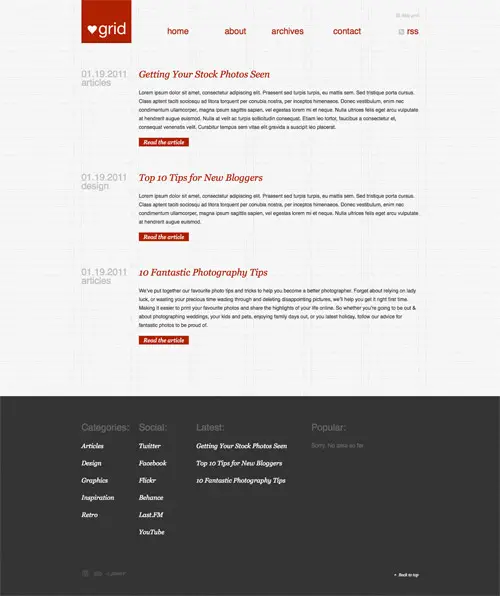
Long time readers may remember the build process of the LoveGrid concept where we designed and finished off the mockup as a static HTML and CSS page. Now let’s take this design and convert it into a WordPress theme. If you want to get your hands on this theme for your own site, it’s now available to Access All Areas over on my graphic design blog – Blog.SpoonGraphics.
How WordPress themes work

WordPress themes are made up of multiple template files that are all contained in a theme folder. When the index.php file is loaded, PHP tags within this file load other template files, such as the header, sidebar and footer to build a complete page. Different template files are loaded depending on which section the viewer is browsing, so page.php is loaded when the user is viewing a page, and single when the user is viewing a blog post.
Within these template files are template tags, which provide the dynamic functionality of a WordPress blog. Most of these tags are pretty simple and just need inserting in the right place within the HTML code, for instance the <?php php the_title(); ?> tag inserts the title of that particular post wherever the PHP tag appears in the theme.
The LoveGrid theme is fairly simple and makes use of just the main template tags. It doesn’t have a sidebar, so sidebar.php isn’t used. Likewise, the search function has been left out to maintain a clean interface, so search.php isn’t required either. When building your theme it’s important to list out the types of template files you will need.
Getting started
One of the first steps you must remember to take when building your theme is to set up the basic theme information. At the top of your style.css document add and edit the following information:
/*
Theme Name: LoveGrid
Theme URI: https://blog.spoongraphics.co.uk/
Description: A premium theme by Chris Spooner of Blog.SpoonGraphics.
Version: 1.0
Author: Chris Spooner
Author URI: https://blog.spoongraphics.co.uk
*/
You will also want to add some CSS styling to make sure the alignment of images works. These classes are automatically added by the WordPress WYSIWYG editor:
.centered {
	display: block;
	margin-left: auto;
	margin-right: auto;
}

.alignright {
	float: right;
	margin-left: 15px;
}

.alignleft {
	float: left;
	margin-right: 15px;
}
Finally, don’t forget to modify the screenshot.png image so your theme displays a nice preview in the Appearance section of the WordPress admin area so it can be identified when selecting a theme.
Header.php Template File
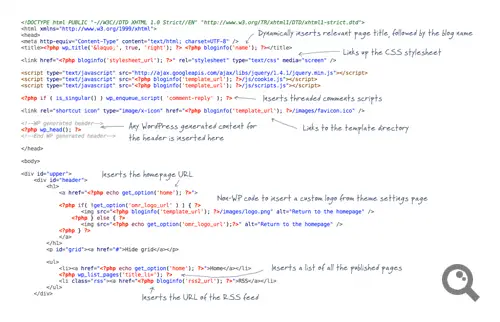
Open up your index.html mockup file and copy the code that makes up the header area. This should include all the elements that will appear exactly the same on every page of the site. Paste them into a header.php file within your theme folder. The next step is to go through and insert WordPress template tags in place of the basic HTML. The first will probably be <?php wp_title(); ?>, which will insert the relevant wording into your HTML <title> tag for each page of the site. Other tags used in the header template are <?php bloginfo('stylesheet_url'); ?> to automatically insert a link to the style.css file and <?php bloginfo('template_url'); ?> to insert a link to the theme directory, which is handy for linking up Javascript files.
Just before the closing </head> tag, the <?php wp_head(); ?> template tag is used so WordPress can insert any additional code into the head itself, such as meta keywords, description and other plugin specific information.
Also included in the header.php file is the header section of the design. Links to the homepage are added using the <?php echo get_option('home'); ?> template tag. In order to populate the navigation menu, the tag <?php wp_list_pages(); ?> is used to display all the WordPress pages, with the title_li= parameter clearing out the default title that WordPress would otherwise add.
Finally, at the end of the navigation list, an extra <li> is added to link to the RSS feed using the <?php bloginfo('rss2_url'); ?> template tag.
Index.php Template File
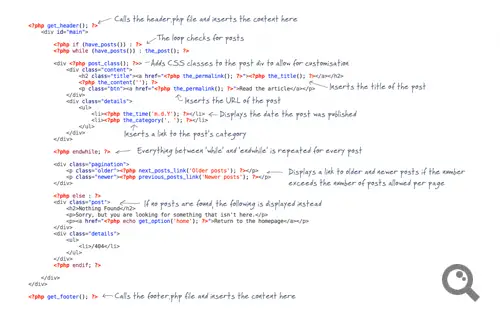
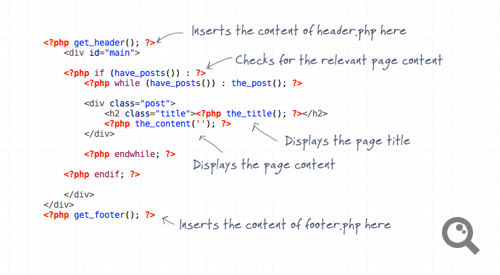
Switch back over to your mockup HTML file and copy the next chunk of code from where the header left off, down to the footer (or sidebar if you have one). This content will be placed in the index.php template file. At the top of this file the first tag you’ll need is <?php get_header(); ?>, this will insert the content of the header.php file above your index.php content when the page is viewed in a browser. Next, the WordPress loop checks for content. Within the loop you lay out the HTML for one post, then this is repeated for every post WordPress displays. Continue replacing HTML content with a WordPress template tag, so <?php the_permalink(); ?> goes wherever there’s a link to the post, <?php the_title(); ?> goes wherever the post title is displayed and <?php the_content(''); ?> tells WordPress where to insert the actual post content.
Underneath the list of posts we can set up the pagination options. Simply insert the <?php next_posts_link('Older posts'); ?> and <?php previous_posts_link('Newer posts'); ?> tags wherever you want these links to appear. Below this we can set up a simple error if no posts were found below the PHP else statement.
At the bottom of the document the footer.php file is called using the <php get_footer(); ?> template tag. This will render a complete page in the browser by combining the header.php, index.php and footer.php files.
Archive.php Template File
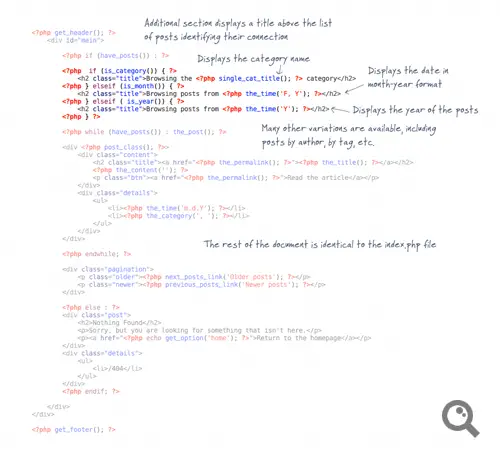
The index.php file is used when viewing the homepage of the blog (unless a page is set as the homepage instead). When the user views a category list or any collection of posts, whether it’s by date, tag or author the archive.php file is used instead. The archive.php file is almost identical to the index, with the addition of a few extra titles to identify what posts the user is browsing.
Conditional tags are used to detemine which snippet of content to display, so <?php if (is_category()) { ?> checks if it’s a category view. If so, a title is displayed that indicates which category it is, using the <?php single_cat_title(); ?> template tag to print the name of that particular category. Similarly, checks can be made on the date and the relevant month and year can be added to the page. If your site makes use of tags and authors, even more titles can be added using a series of other conditional tags. See the WordPress Codex page on Conditional Tags.
Page.php and 404.php Template Files
There are two types of content on WordPress blogs, posts and pages. Out of the two pages are often the most simple. The page.php file is pretty much a stripped down version of the index or archive templates. It still includes the link to the header file, the WordPress loop and the tags to generate the page title, but on a page we don’t need a date, read more link, or meta information.
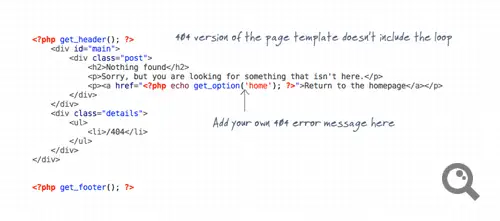
Another template file that acts similar to a page is 404.php. This file allows you to customise an error page just in case a 404 File Not Found error appears on your blog. This file is even more simple that page.php as the content is coded directly without any special WordPress tags.
Single.php and Comments.php Template Files
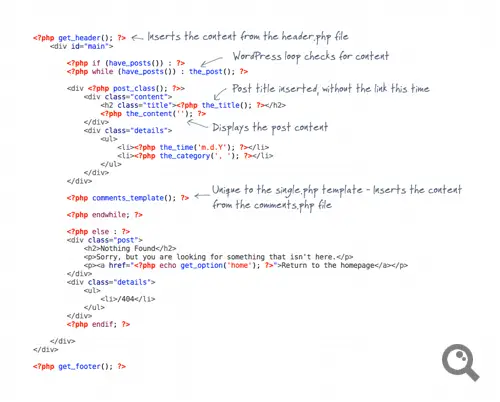
The single.php file is the template used whenever a blog post is viewed. The first portion of the file is pretty much identical to how the post content is laid out in the other template files, the main difference is blog posts also include comments, so the <?php comments_template(); ?> template tag is used to call the comments.php file.
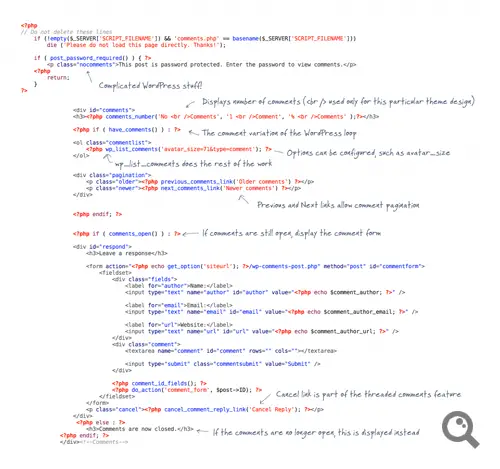
Inside the comments.php file there’s a bunch of comment specific tags that enable you to build a thorough comments section. <?php comments_number(); ?> is a simple tag used to display the number of comments on a post, with parameters allowing you to edit the wording as you please. The comments file has its own mini loop, <?php if ( have_comments() ) : ?> checks to see if there are any comments on the post, then the whole list of comments is simply inserted using just one tag: <?php wp_list_comments(); ?>. The comments file has its own set of pagination links, which combined with the WordPress discussion settings allow you to split comments over multiple pages.
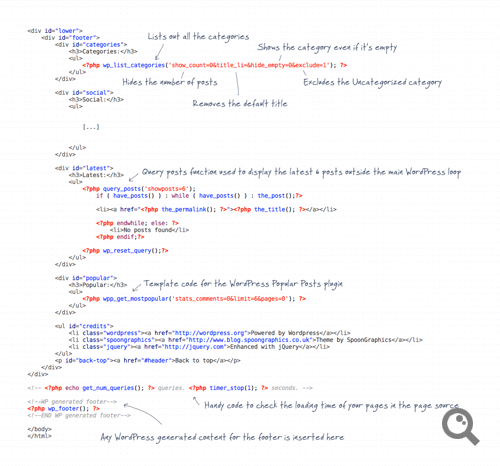
To finish off the theme, all we need to do is fill out the content in the footer.php file. Remember this file has been called from many of the other template files to round off the page with the rest of the HTML required. The file continues where the others left off. In this particular design the footer file begins with a list of categories using the <?php wp_list_categories(); ?> template tag with a range of parameters clearing out the default post count and title as well as hiding specific categories such as ‘Uncategorized’. Usually this particular template tag would be found in the sidebar, but as with most WordPress tags it doesn’t matter where you place them in your theme.
Next up in my footer file is a spot of <?php query_posts(); ?>. This section isn’t someting usually required in your average theme, but it is used to create a separate list of posts outside the main WordPress loop. In this theme it’s used to display the latest 6 posts.
Another tag you wouldn’t usually see in a theme is <?php wpp_get_mostpopular(); ?>. This particular tag is unique to the WordPress Popular Posts plugin, but it shows how additional functionality can be added using plugins and their custom tags. In the public theme this tag is wrapped in a <?php if (function_exists); ?> statement to ensure it doesn’t break the theme if that particular plugin isn’t installed.
The Final WordPress Theme
So basically the whole process of building a theme involves pasting a bunch of template tags in between your HTML. Many of the most common tags are listed out in this post, but you’ll also want to keep the WordPress Codex open in order to refer to the whole library of template tags available. On most occassions there’s a tag out there that will help you achieve the exact function you have in mind.
With all the HTML, CSS and PHP template tags in place the theme is now ready for installation and testing.


Nice Work, I have seen many theme making tutorials on WordPress lately and this one is the simplest one to understand and Follow.
Thanks and keep writing.
Excellent article! It will definitely help my students to get a better understanding of how the structure of WordPress works.
Great share chris. Most people recommend child theme though.
I used this today for a new website and it’s been a great help. Thanks :)
Thanks, but Currently i am toying with this wordpress theme building framework “TemplateToaster” for creating themes from scratch with minimal coding.
great informative article but i think web designers should have some good knowledge of php as well now,as php is getting more and more important in terms of demand these days even this article can help us just when we have some understanding of php.
Excellent, thanks, It' easy learn when the contents are clear. Tahnks.
It's nice but there are some things that do not follow WP3 best practices. For instance, JS scripts should be loaded using wp_enqueue_script instead of directly hardcoding the URL.
Great article! The graphics clearly enhance the tutorial of creating your own custom WordPress theme. Building a WordPress theme can certainly be intimidating! This is a great guide for those learning the WP ropes as well!
Wow, I'm gonna send this article to my designer, although he might already know most of the info it's nice to see it dsiplayed in a good visual way.
This is exactly what I've been looking for, I have a couple of sites that I need to get over to WordPress and this looks a great tut. Thanks for sharing!
This is really impressive! I read a couple tutorials about this before, but none like this.
Thanks for the tutorial. I also lear''t from a training company called Futuretrend. They were extremely good.
Good tuts. but it would be great if you share the style sheet.
Thanks for sharing anyway.
Nice tutorial, thanks for sharing
This is a great article, thanks for the post. You broke down the process of making a theme and made it simple for anyone to follow. A+++ from us on this post, great job!
The same logic you used here can be used to breakdown and customize other themes out there as well.
clean and simple, great job!!
Thank you for taking the time to explain how to create a WordPress template in explicit detail.
Most articles I have read on the topic template building typically leave out key steps or brush them over only to cause frustration for designers.
This a fabulous tutorial. I have just set up my new website and I am glad to know that my blog will look identical to the rest of my site.
I will try my luck in building my theme and will make more pages as they fit my needs (i.e search.php, author placeholers etc…)
This article is priceless.
Thank you for sharing.
It is always a delight to feel what I believe – that
information is inspiration
thanks. this helps in editing my theme. now i have an idea of whats whats and where it is.
Great job, thank you. But WordPress should and can manage themes made with HTML5 and CSS3 for better performance and flexibility, that's what I'm using at the moment.
Nice tutorial, Thanks Chris.
Nicely done there Chris. Building a WordPress theme can be quite intimidating until you realise it's all about PHP includes and template tags. A very useful guide!
Hi there ! thanks for sharing it !
i've translated the infography of yoast on the same subject into french on my blog : https://gregoirelemaire.fr/wordpress/2011/01/wordpress-decortiquee-anamotomie-dun-theme-wordpress/
So great ! I also find like this tutorial. Now I can reference from this post.
i will book mark this and share wirh my friends i read some of your post its nice and useful info i learned some new points here thanks… i will visit again
hi good work useful for all
i think this is so good theaching if i work to undrestand some words i'll make best one
that was great i can't speak your language as well as you.so i can't undrestand your teaching very well….i'm trying to mak my own page by your writting
Hey sort of on topic, I just wrote a cool blog post regarding the debate about using themes, if your interested:
https://www.digitalreaction.net/2011/02/01/why-digital-reaction-is-down-with-theme-based-web-design-sometimes/
Really nice post thank-you.
Thanks for the kind comments everyone.
@Neil – Well spotted. It looks like I've manually added the jQuery library while WordPress also automatically added it in the wp_head tag. I should clear that out with a little snippet in the functions file.
@Brandon – The complete theme file is all ready to install and use. It's available via the Access All Areas link in the post if you're interested.
@Drew – I can't say I'm much of a widget user myself so I tend to exclude them from my themes. I know they're popular though so if you're building a theme for the masses it would be worthwhile including widget support.
@Mike – I also started out modifying the default theme. Once you get the hang of it it's not too hard to then move onto creating your own themes from scratch.
@Paul – That's a good suggestion for a future post. I remember creating a feature content slider type thing on a client project.
Thank you so much! I love your tutorials, and this was just what I was looking for at the moment!
Great article.. thanks…!
Great tutorial :)
Love the basic breakdown, thanks, I think I may be working through this sooner rather than later.
Cheers!
Good Stuff! Usually I use bloginfo('url') to get the 'Home' url for links, but using 'echo get_option('home')' seems to make much more sense -> on the chance that the home page is something other than the root, this may assist in avoiding any issues.
Good stuff Chris. Tutorials like this should be given recognition mate. Well done.
Awesome tut!
It's always interesting to see someone's work process.
Loved the tutorial. I'd love to see how you'd implement a featured slider in a theme like this one. Maybe something you may want to expand on.
fantastic!!!
People new to WordPress should probably try creating a Child Theme to Twenty Ten (the default theme) rather than one from scratch. Even as an experienced WordPress dev who's used the platform since Beta in 2002(3?), I find that a Child Theme is the way to go 99% of the time.
Good point. Check the article title again though.
Nice work, makes it look easy too. I find it's easy up until a certain point, especially if developing a theme to be used by beginners as they want widgets enabled etc. However, it's quite easy when you get the hang of it. I did all the theme on my site, took me a while to get it how I want it and it's a never ending project so far as I'm always changing it.
How does this template need to be stored for individuals to use it on their sites? In a folder with instructions for uploading and changing themes?
Thanks for the tutorial.
I made a blank wordpress theme for a perfect start, based on the WP 3.0 standard theme. Take a look! https://www.shiftedwork.de/blog/2010/09/03/nackt-blank-wordpress-theme-sandbo/
Awesome!
I tried to understand wordpress theme better.
And I found this tutorial. Thank!!
Nice layout! Clean and simple.
good one chris……..
its really good. :)
thanx.
Thanks for this great stuff, just wondering why you have jquery loading twice?
Great work here, Chris. This the type of post I always wish(ed) had come around. I know all of it now thanks to hours of work and trial n' error.
There will be lots to young designers VERY excited to read this!
Xcellent tutorial
By following this, even novice can become professional in creating wordpress themes
Nice design! However, the tutorial needs to be simplified and updated to add latest WordPress features like Menu. You shouldn't have talked about theme options in a tutorial for novices.
Fantastic! this is perfect for our advanced students.
wow, man! I read a couple tutorials about this before, but none like this one :)
Thanks for the post!
Its really makes it a lot easier to understand.
I just love the result, thanks for sharing!
Great stuff, it's funny how much less intimidating the whole process becomes when someone break it down properly…
Once you've learnt what the various WordPress tags do the process of building a theme is quite simple really.
Chris can u put on a tut for SEARCH AND SIDE BAR FUSE to this template.
Will be happy!…
Thanks