Line25 is reader supported. At no cost to you a commission from sponsors may be earned when a purchase is made via links on the site. Learn more
So far in this WordPress theme tutorial series we’ve put together a visual concept in Photoshop and coded up a working prototype in HTML and CSS. Now let’s take our static web page files and create a fully working WordPress theme by splitting up the code over the various template files and injecting the relevant WordPress PHP tags.
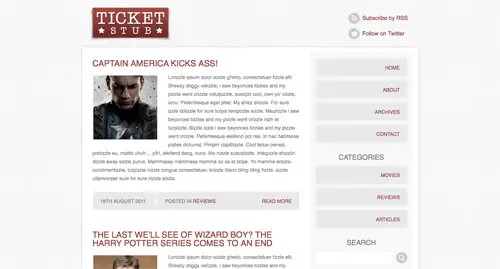
The site we’re building is a WordPress theme called Ticket Stub. It’s based on the idea of movie review, but the clean layout and basic styling keeps it generic enough to be used for any topic.
View the final WordPress theme demo
WordPress template files
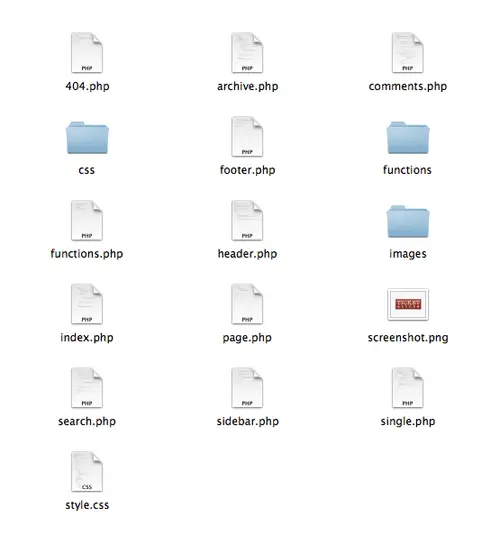
A WordPress theme is made up of various PHP template files, each of which is called to render out a specific type of webpage. For instance the single.php file renders the blog post view, whereas archive.php renders lists of posts based on some kind of filter. In the case of this theme, we’ll be using the index.php, header.php, sidebar.php, footer.php, archive.php, search.php, 404.php, comments.php, single.php, page.php and functions.php files as well as style.css, our own CSS folder containing IE fixes and a special functions folder containing files to create an admin settings page.
Style.css template file
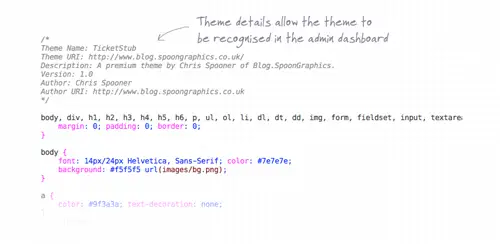
The first step when creating any WordPress theme is to customise and set up the theme details in the style.css file. Paste in the entire CSS from the prototype, then edit the theme details. These details will show up in the themes section of the admin dashboard to identify the theme.
Header.php template file
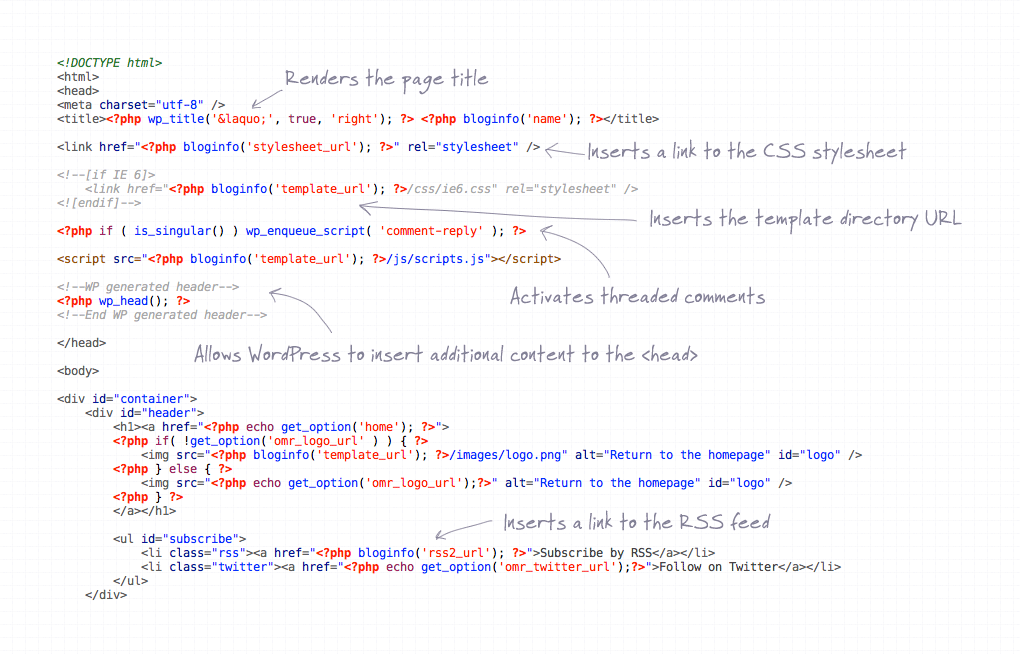
It makes sense to work from the top down, so open up your index.html prototype webpage and the header.php WordPress theme file. Paste in the contents of the index.html file from the top right down to where the main content begins. All we then need to do is replace key elements with WordPress tags, which inject the dynamic information when the page is viewed live.
Examples of these code snippets include <?php the_title(); ?> to render out each post or page’s title, <?php bloginfo('stylesheet_url'); ?> to insert the link to the WordPress stylesheet and <?php bloginfo('rss2_url'); ?> to insert a link to the blog RSS feed.
Elsewhere in the code, a spot of custom coding is added to allow for a logo to be selected via an admin settings page as this theme will eventually be made public.
Index.php template file
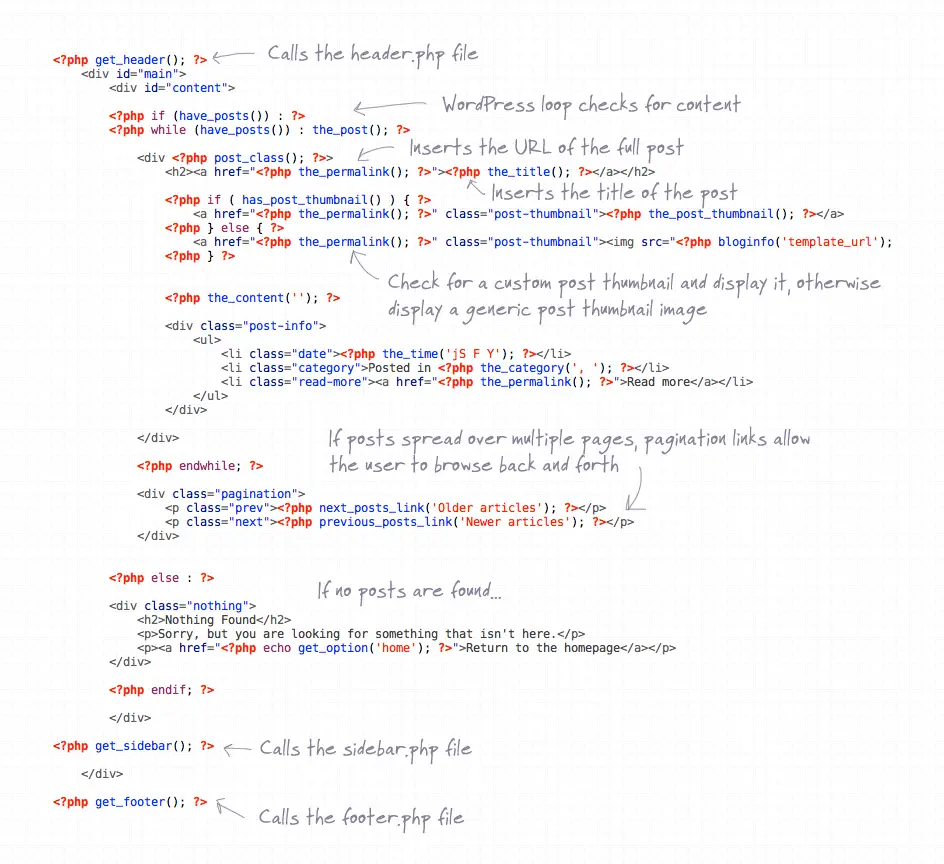
The index.php is one of the core files that is called to render out a complete page. The index is usually used to display the blog homepage. The file begins with the tag <?php get_header(); ?>, which calls and inserts the contents of the header.php file in its place. At the bottom of the document are also tags to fetch the sidebar and footer, which when combined in the browser form the full web page.
Inside the content div the WordPress loop checks for content, then the following code is wrapped in a while statement which basically repeats for each post found. The HTML that makes up the blog post intro is pasted in, then key elments are replaced with WordPress tags to allow the content to be dynamic. So <?php the_permalink(); ?> inserts the link to the post, <?php the_title(); ?> inserts the post title and <?php the_content(); ?> inserts the actual post content.
Some tags have special parameters that allow you to control or edit how the tags works. An example is the previous and next links within the pagination section. The text used in these tags can be controlled by entering new content between the brackets.
Sidebar.php template file
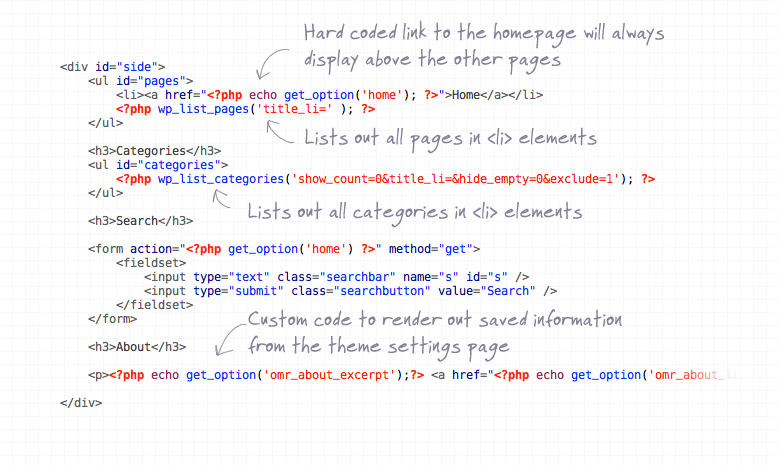
The next file to be called near the bottom of the index.php file is the sidebar. All the HTML from the prototype from the bottom of the content down to the footer is pasted into this sidebar.php file. Tags such as <?php wp_list_pages(); ?> and <?php wp_list_categories(); ?> are used to list out the pages and categories stored in the WordPress install. These two tags also have a range of parameters to customise their appearance. title_li= removes the default heading above the list, show_count=0 removes the post count from beside each category, hide_empty=0 shows the category even if it has no posts and exclude=1 hides the default “Uncategorized” category from the list.
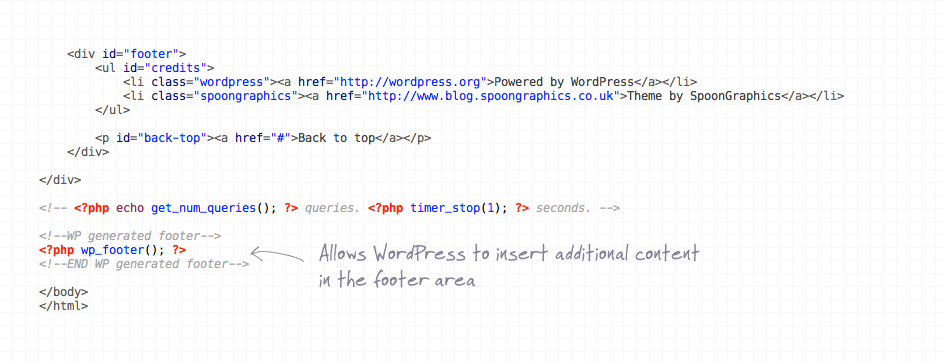
In the case of this design, the majority of the footer is just plain old HTML. Some other designs may include a large footer with a wealth of information. Any of the tags can be used anywhere in the template files, so you could list out the pages and the categories in the footer if you so pleased. It’s always handy to create that prototype HTML and CSS concept beforehand, as your theme will be ready to go as all the content inserted by the WordPress tags will already be styled with your CSS.
The only major tag used in the footer is <?php wp_footer(); ?>, which designates where WordPress can inject any additional footer related content. A similar tag is also used in the header.
Archive.php & Search.php template files
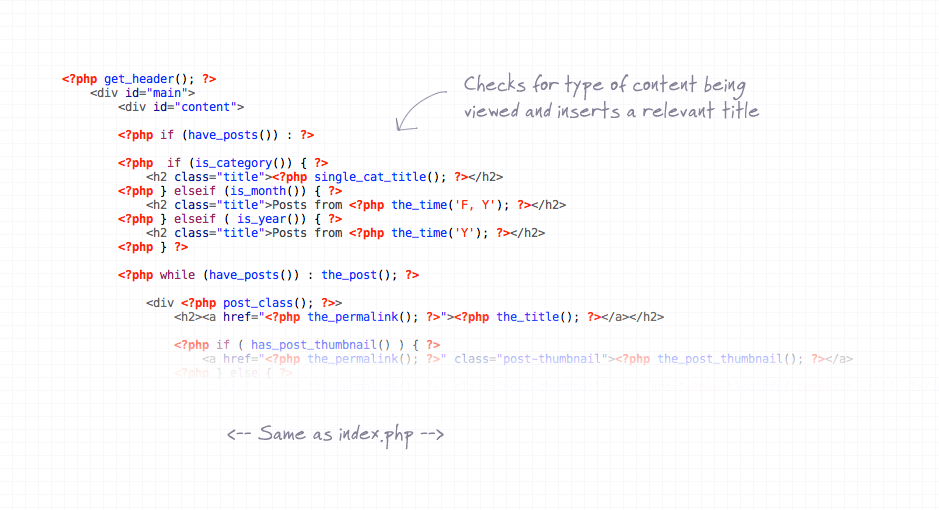
Two template files that work in a similar way to the index.php file are archive.php and search.php. These two files can be created as duplicates of the original, with just a couple of edits and adjustments. The archive.php file is used whenever posts are being displayed along with some kind of filter, such as posts in a certain category or from a particular date. To give the viewer an insight into the types of posts they are browsing a series of if statements can control which header is inserted above the content. For example is_category checks the viewer is browsing is particular category, if so the title of the category is inserted into a H2 using <?php single_cat_title(); ?>. The rest of the content is identical to the index.
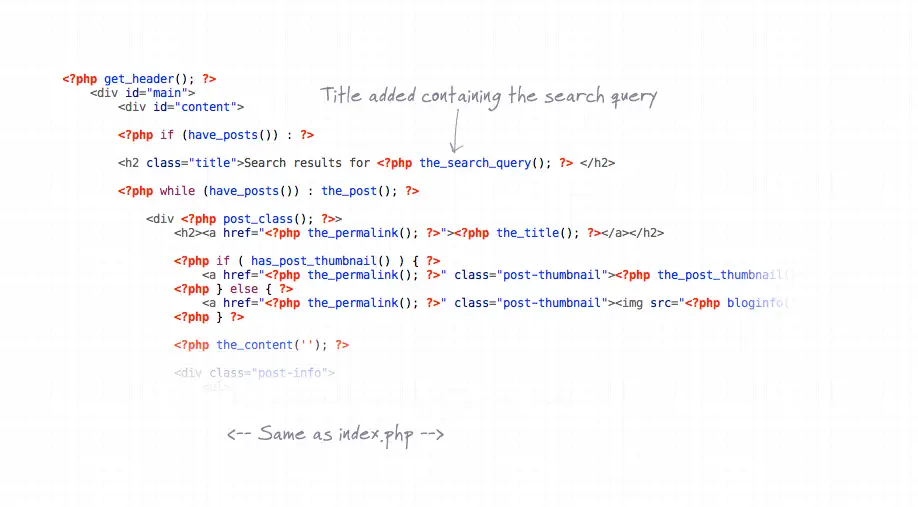
In the case of the search.php file, a heading is added with the code <?php the_search_query(); ?> injecting whatever queries the viewer is searching for.
Single.php & Page.php template files
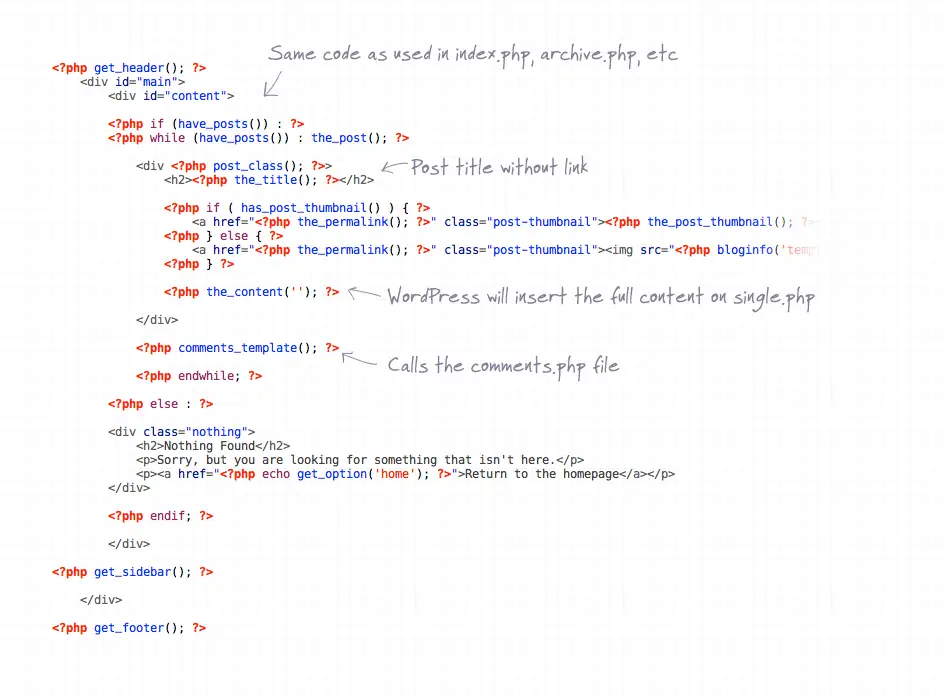
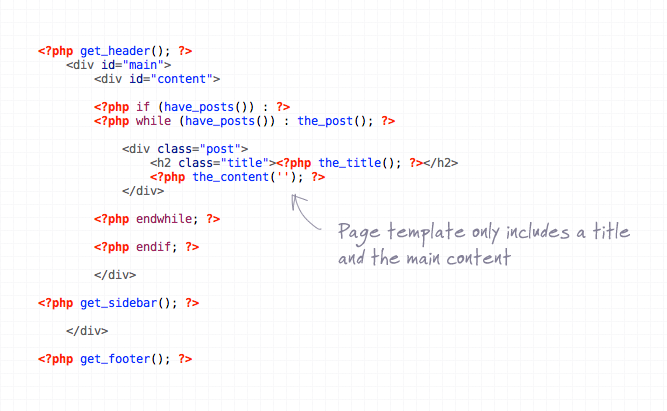
We’ve completed the template files that collate various pieces of content, now let’s code up the files that actually display this content. Single.php is the file used to display a blog post, page.php is used to display a page. Each file still begins with a loop to check for the content being requested, then the title is dynamically inserted using the same <?php the_title(); ?> tag, this time without the surrounding anchor. Also appearing in the single.php template is the custom thumbnail code which checks if a post thumbnail has been selected and displays it, or if not it displays a generic image in its place.
One tag that can be added to both the single and page templates is <?php comments_template(); ?>, but is most commonly reserved for just the single.php template. This tag injects the commenting system into the layout, which calls the comments.php template file.
Comments.php template file

The comments.php file covers the whole list of comments and the comment submission form. Inside the file there’s a bunch of comment specific tags that enable you to build a thorough comments section. <?php comments_number(); ?> is a simple tag used to display the number of comments on a post, with parameters allowing you to edit the wording as you please. The comments file has its own mini loop, <?php if ( have_comments() ) : ?> checks to see if there are any comments on the post, then the whole list of comments is simply inserted using just one tag: <?php wp_list_comments(); ?>. The comments file has its own set of pagination links, which combined with the WordPress discussion settings allow you to split comments over multiple pages.
Finishing touches
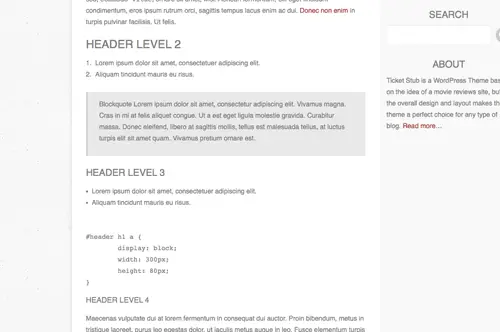
Once all the main template files have been filled with HTML content and WordPress tags it can be installed and tested. Create a series of blog posts and alter the posts-per-page setting to check the pagination buttons display correctly, add a range of different HTML to a post using various headers, lists and quotes in order to style up everything in your CSS file. We never included a design for the comments section in the original tutorial, so now would be a good time to conceptualise and mock up the comments section using a mixture of Firebug and a CSS editor. All the comment section is created from one tag, rather than individual tags being inserted into your original HTML, so styling this section up using the working theme as reference is the easiest approach.
The final theme demo
The whole process of building a theme basically involves pasting a bunch of template tags in between your HTML. Many of the most common tags are listed out in this post, but you’ll also want to keep the WordPress Codex open in order to refer to the whole library of template tags available. On most occasions there’s a tag out there that will help you achieve the exact function you have in mind.
Comments are closed.