Line25 is reader supported. At no cost to you a commission from sponsors may be earned when a purchase is made via links on the site. Learn more
Mandalas are circular designs that specify the eternal nature of life. Mandala is a Sanskrit word for the shape circle. It is a geometrical design that symbolizes the Hindu and Buddhist cultures. It is a symbol for ritual and spiritual pathway in Asian cultures and norms.
A Mandala depicts two different points: 1. it is a visual representation of Universe, externally; 2. internally as a guide to several practices of Asian traditions which also includes meditation. The Mandala is generally formed on cloth, paper or a surface with the use of threads, fashioned in bronze or built-in stone.
There are numerous ways to create circular Mandala designs in Adobe Illustrator. A basic technique to create a Mandala in Illustrator is, by using a pattern brush tool to design multiple patterns that repeat seamlessly, which is a challenging task to accomplish.
But there is an alternative method for this as well. You can use Illustrator’s symbol feature to create a fake kaleidoscopic design where a part of the design is copied around a given centre point to create a mirror effect. This method is advantageous as well as quick; you are going to be surprised to create Mandala in almost no time.
As we can see, this Mandala design is a very sophisticated looking art form. It appears as if there is a lot of tedious and detailed drawing, but you can make such Mandala with the use of symbol feature in Illustrator. With this technique, you just create one portion of the entire Mandala, and the rest of the design is created by Illustrator automatically. Let us see how.
1. Start with a new document:
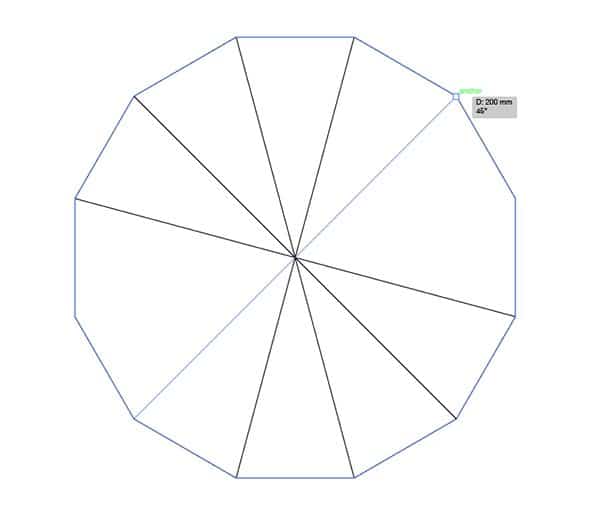
We begin by creating a new document in Adobe Illustrator. You have to select the polygon tool and bring up the shape settings by clicking on the artboard. To increase the complexity and the detailing of your Mandala, increase the number of sides your shape can have.
Enter “12” in the number of the sides’ parameter and enter “100 mm” in the radius field. These specifications create a polygon in your document. You should turn on the Smart Guides by pressing CMD+U and then form lines with the line tool between each point of the Polygon. You can snap and trim the corners using green Smart Guides.
Smart guides are dynamic objects that give you useful feedback as you go about drawing your objects in the Illustrator. Illustrator offers 6 types of Smart guides available in a dialog box called Preferences. They are easy to enable and disable from View menu. The 6 types of Smart guides are:
- Alignment guides: It aligns objects while you draw, move or edit the objects. This guide helps you align the objects and anchor points to the centre of the edges of the objects close by without pulling the guides from the ruler.
- Anchor/Path Labels: This label appears when you move the mouse over the object that you have created to let you know the location of the anchor point, centre point or edge of the object under your cursor. When you have intricate designs to work with, this guide comes handy.
- Object Highlighting: When this Smart guide is enabled, you can see which objects are highlighted with a selection outline as you move your mouse over the objects. It is particularly useful when you have several objects over your artboard. You can also have a preview of what object can be selected when you click. It also lets you see where the objects have live effects applied.
- Measurement Labels: If you want to check the size, distance and position of the object as you draw, move or edit the object, this Smart guide comes to play. This Smart guide helps you with precision factors when the layout and placement of the objects are concerned.
- Transform tools: This Smart guide is useful when you are functioning with Rotate, Shear and Scale tools. These guides help you find and apply transformations to the standard angles while you draw your objects. This guide allows you to avoid the use of the Shift key while drawing in the same way.
- Construction guides: To constrain the line segments to a specific angle, these Smart guides come to play when you are playing around with the Pen tool. You are free to select the preset angle measurements, or you can even specify your angle measurements to draw line segments at a particular angle.
2. Breaking down the Polygon:
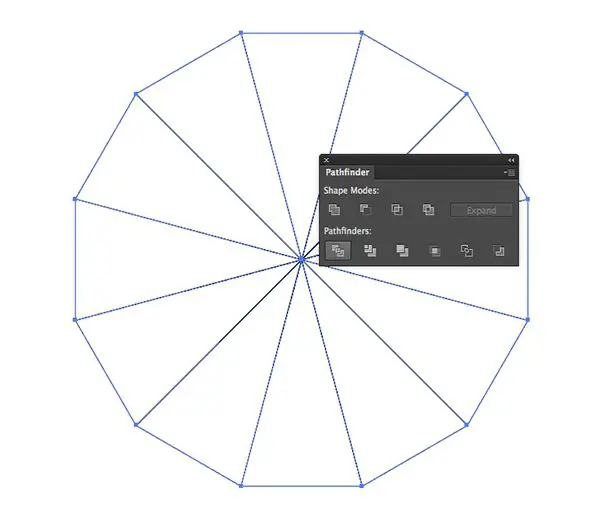
When you have snipped the corners of the Polygon, you draw the selection around the objects of the Polygon. Now from Pathfinder, click the Divide button to break down the Polygon in 12 triangle segments. To break the Polygon into individual pieces, right-click on the document and select Ungroup. The Pathfinder palette is one of the unique features of Adobe Illustrator. It saves you time when you want to create detailed vector graphics and designs. With Pathfinder, you can create customized shapes and paths by putting Pathfinders and Shape Modes within the panel.
With Ungroup option, while designing vector objects, it is possible to apply a certain kind of effect to the group of objects. In that case, you need to group your objects first and then start applying effects to those grouped objects. But if you want to modify one object from the group of objects, you must first Ungroup them.
3. Selecting one of the triangles:
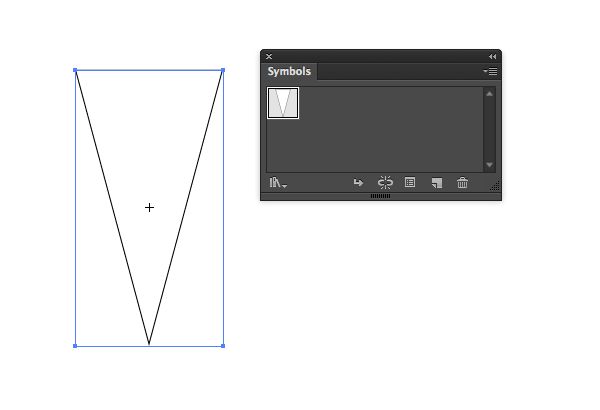
Once you have broken down the Polygon into individual triangles, apart from one triangle, delete the remaining triangles. Save only one triangle. Click the New Symbol button and add this graphic to the Symbols panel.
After following the steps mentioned above, you have to zoom into the document after turning on the Outline mode from the View menu in the Adobe Illustrator. Click the point of the triangle while holding the ALT button and selecting the Rotate tool. Enter 30 in the angle field in the Rotate window, and then click the Copy button.
When it comes to creating geometrical and psychedelic designs and patterns, the Rotate tool generally comes to play. The Rotate tool enables you to turn an object around a designated fixed point. By default, the centre point around which the object rotates is the centre point of the object. While working with the multiple objects on the artboard, all the objects rotate around a single centre point referenced with the centre of the bounding or selection box.
4. Creating a pattern:
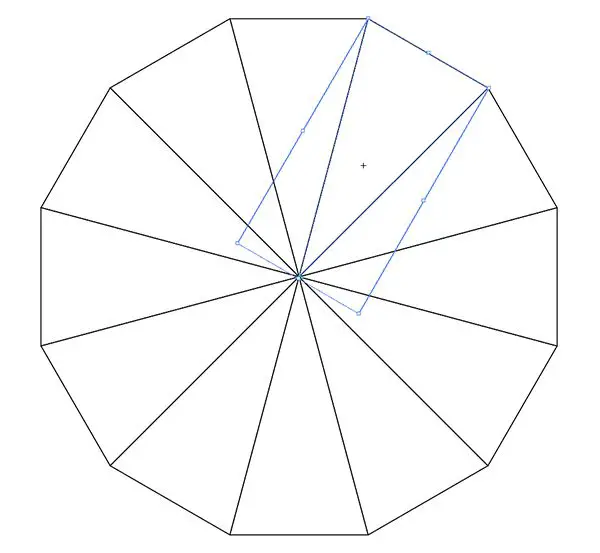
Once the angle is 30 degrees, click Preview in the View menu to get back to Preview mode. Press CMD+D, which is the shortcut of Transforming Again, which generates 11 more triangles to complete the entire Polygon. To edit the symbol, you have to double click on the first triangle.
The most important thing to notice here is, any editing in one of the triangles gets reflected in all the other parts of the Polygon. We are reaching our aim now. We just have to create a pattern within one triangle which gets duplicated in other instances of the Polygon to form a complete design, here it being Mandala.
5. Start drawing the pattern in the triangle:
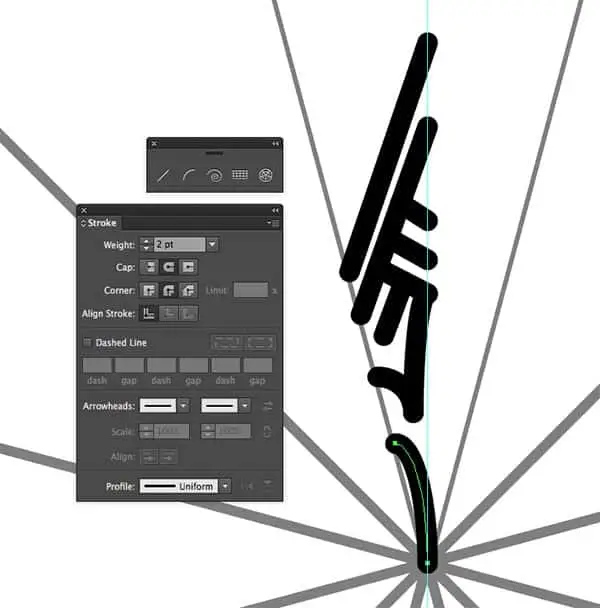
To avoid the strokes moving out of their position, you can lock it, and you have to place a guide down the centre of the shape. To begin drawing the strokes and patterns to create an intricate Mandala, you can set up a black stroke with dimensions of 2 pt and round corner styling. You can find The Stroke panel on the right side of your screen, which gives you the option of applying the weight of the stroke. Strokes emphasize the importance of your compositions if you know how to use them.
You can then use the mix of Arc and Line tools to draw the pattern in one half of the symbol area, which is the place between shape outline and centre guide. To snap the points to other existing points, paths, guides and extra strokes, you can make use of Smart Guides again.
6. Dotted Lines to make it enjoyable:
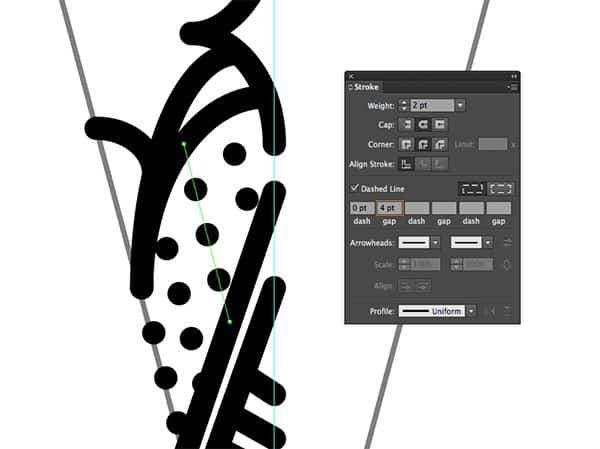
To make the Mandala look more exciting and beautiful, you can add dotted lines. To do that, from Stroke panel, turn on the Dashed Line option and set the dash measurement to 0 points and set the gap approximately to 4 points.
Exciting designs and patterns can be formed by stretching multiple arcs from a single point. To accomplish this, you can flip the direction of the arcs by pressing the F key, which is the shortcut for Flip. To fill any gaps, you can add basic circle shapes with the Ellipse tool. The vector tool effect called “Reflect” enables you to flip an image, and create a mirror-like effect. To select the Ellipse tool, you have to click and hold the Rectangle tool to explore various drawing options and then select the Ellipse. Once selected, you can draw ellipse objects by diagonally dragging the mouse cursor across the Illustrator document. You can also specify the width and height of the Ellipse.
7. Filling the shape:

You have to form and stretch random patterns to fill one half of the symbol of the Polygon. You can use filled shapes and colors to enhance the design in the symbol. And to achieve the Henna style intricate designing and patterns, you should use single weight lines which brightens one portion of your Mandala.
You have to draw a selection around the paths and strokes, Copy by pressing shortcut CMD+C and Paste in Front by pressing the shortcut CMD+F. After this, you have to group the shapes by pressing the shortcut CMD+G. Now, go to object>Transform>Reflect and select the Vertical option. To fill the other half of the triangle, drag the duplicate to fill the other half of the symbol. You have to make sure that you align both the halves perfectly along with the centre guide.
The Transform Tool is useful when you want to move, rotate, reflect, scale and shear the objects. To perform multiple transformations, while copying the objects, the Transform Again command lets you perform the actions mentioned above countless times until you have a different transformation action to perform. You can view the size, location and orientation of one or more selected objects from the Transform panel in Illustrator. Reflect option is used to flip the object across an invisible axis that you have specified. While using the Free Transform tool, the Reflect tool or the Reflect command, you can reflect objects and designs in Adobe Illustrator. Reflect tool is helpful when you want to reflect the object concerning a specified axis.
8. Duplicating the pattern all over:
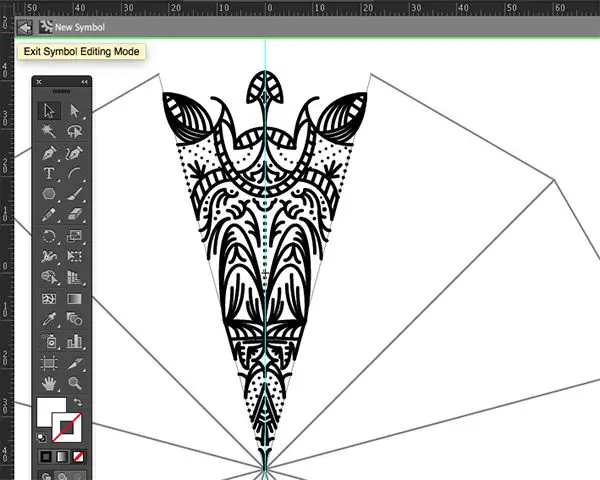
Once you have aligned the two halves perfectly in the previous step, Exit out of the Symbol Editing mode by clicking the small arrow at the top of the document window. Once you exit the editing mode, you would see that all the other contents of this symbol are going to be duplicated and applied to the remaining other triangles of the Polygon. It duplicates the pattern around the entire Polygon, which forms the Mandala.
If you want to tweak or modify the design, you can double click the symbol and go back to editing mode where you can change the design according to your requirements. Once you have done editing, you have to delete the duplication of the groups. You have to alter the paths and follow the previous steps again to reflect the changes in all the other triangles of the Polygon before you exit the editing mode.
A symbol is an object that you can use for as many times as you want, in an Illustrator document. For instance, you can add small instances of a flower without actually adding the intricate art, if you are creating symbol from the flower. To modify a symbol, you can change its essential artwork, or you can redefine the new artwork for the existing symbol. You are changing and redefining symbol changes the appearance in the Symbols panel and the segments of the artwork of the document.
Conclusion:
It is exciting and beautiful to see how simple lines, patterns and curves can form a fantastic pattern. And when the design you see in the final result, it is hard to find the origin of the design because every part duplicates beautifully. This easy duplication of the pattern makes it look seamless.
The intricate pattern that resembles the Henna design is an arduous task to accomplish. But the symbols feature in Illustrator, makes the task becomes easy for all the graphic designers. Hence, Adobe Illustrator remains one of the most selected options among the topmost Graphic designers.