Line25 is reader supported. At no cost to you a commission from sponsors may be earned when a purchase is made via links on the site. Learn more
One of the biggest questions that designers face is how to organize images so it is easy to retrieve them. All designers and photographers have the habit of collecting good resources and creative design assets with the idea that they will be helpful in future projects. But the problem lies in trying to quickly fetch those assets when they are needed.
At the same time, there will always be top designs created or regularly used images that they want to use over and over again. They can do this only if they have a well-organized and easy-to-use structure for the storage of their images, illustrations, vectors, and so on.
As the world increasingly moves online, our need for effective image management solutions grows. Whether you are a professional photographer, web developer, or just an enthusiastic graphic designer, chances are you have hundreds, if not thousands, of images stored on your computer, phone, and other devices.
sponsored message
The Eagle App – Easily Organize & Browse All Your Digital Assets
Before we continue, let’s take a brief moment to look over the popular Eagle App used for image management. This app was built for designers that handle a lot of digital assets.
The Eagle App is an intelligently designed program to help you create a library of all your media assets, supporting over 81+ formats for Videos, GIFs, Images, Textures, Fonts, 3D Objects, and more.
10 Methods On How To Organize Images Fast In 2022 Overview
- Create a Folder Structure
- Use Proper Naming Convention
- Use the Proper Tags
- Delete Duplicate Images
- Edit Your Images
- Compress / Convert Images
- Archive Your Images
- Setup a Schedule
- Setup a Search Engine
- Use Image Management Software Program or Application
How to Organize Images Fast in 10 Steps

1. Create a Folder Structure:
The basic answer to the problem of how to organize images is the creation of a folder structure. If you don’t already have a system to organize your images, now is the time to create one. A well-organized folder structure system will help you keep track of where all your images are stored and make it easier to find specific ones when you need them. There are a few different ways you can go about creating a system. The more complex and time-consuming method is doing it manually. Another option is using good available tools to do that for you.
2. Use Proper Naming Convention:
One factor that makes professional designers stand out is the discipline they follow while naming their files. To organize your image in a better way, you need to create your naming convention. There are many standard methods that you can adopt. These structures can be based on the projects, genre of work, date, or even clients. Such a naming convention will also help in version control.
3. Use the Proper Tags:
Tagging is a process that is highly undermined but delivers excellent results. Designers generally avoid tagging as they think it will take much time. But they need to understand that with the proper tagging structure, they will be able to save much time when searching for images. Your system will have the ability to give multiple tags to images. You can decide on a structure and implement it for all images. Make sure that you use the same tag structure for all images so as not to create confusion in the system.
4. Delete Duplicate Images:
One of the best ways to clean up your image collection is to delete duplicate images. Duplicate images are those that are exact copies of each other. They take up unnecessary space and make finding the images you’re looking for challenging. There are a few different ways you can find and delete duplicate images. One option is to use a tool like Adobe Lightroom, which has a built-in feature for finding and deleting duplicates. Another option is doing it manually by sorting through file names or using a third-party tool.
5. Edit Your Images:
Another great way to organize your images is to edit them. Editing your images can help you get rid of bad photos, reduce file sizes, and more. Moreover, because you have edited the images, you will have a better recall of them and be able to classify them better. Also, you may not want to keep the whole image for some images, so you can edit and crop the images. While this task can take its reasonable time and be resource-intensive, you can use online editing tools to help you edit images quickly.
6. Compress / Convert Images:
Another great way to reduce the file size of your images is to compress or convert them. This can help you save space on your hard drive and make it easier to share your images online. Also, it will reduce the load on the design software that you will use. Converting images also ensures that they will be in the correct format whenever you want to use them. There are many free online tools available for image compression that you can use. However, don’t compromise on the image quality by compressing the image too much.
7. Archive Your Images:
If you have an extensive collection of images, you might want to consider archiving them. Archiving your images can help you save space on your hard drive and make finding the images you’re looking for easier. There are a few different ways you can archive your images. One option is to use cloud storage like Dropbox or Google Drive. Another option is to use image management software with a built-in feature for archiving images. This will also ensure that you take a backup of your images regularly.
8. Setup a Schedule:
Doing all the above steps takes time, and the unfortunate part is that they need to be done regularly. You may feel charged up one day and do the image management tasks for one day but eventually, stop doing it. Then you will end up again in the mess of images. Hence it is best to create a schedule to run the image management tasks and ensure that you are maintaining a good and cleansed folder structure. The problem of how to organize images effectively needs consistent work. The frequency can be every couple of weeks or monthly, depending on the volume of images you deal with.
9. Setup a Search Engine:
If you want to level up your image search abilities, you can explore setting up a customized search engine. This option works best for designers who keep their resources online or on a specific server. However, this task is not easy, and you may need external technical help. But once it is set up, you will be able to search images from your system just like you search images on Google. These tools can be beneficial for finding images that are buried in your collection.
10. Use Image Management Software Program or Application:
While all the above steps are reasonable to execute, they are time-consuming and labor-intensive. The good news is that many good image management software can show you how to organize images in the best way possible. These tools are designed specifically for managing extensive collections of images and can be a huge help when it comes to keeping your images organized. In addition, they are loaded with many outstanding features like creating folder structure, tagging, advanced search, and a lot more.
Benefits Of Organizing Images With An Online Tool
And if you’re like most people, those images are probably in a bit of disarray. All these lead to the big question of how to organize images in the most effective way. Because for most of us, time is of the essence and we don’t want to waste it looking for design assets.
There are many benefits of using an online, cloud-based image organizer, software program, or application:
- You’ll be able to find what you need faster
- You can avoid duplicate files
- Your work will look more professional
- You’ll save space on your computer
- You’ll be less likely to lose important files
- You can share files more easily with others
- You can back up your files more effectively
- You’ll be able to use design software more efficiently
- You can collaborate with others more easily
- Your workflow will be more efficient overall
Organizing your images may seem like a daunting task, but it’s worth it in the end. These benefits will help you work smarter and faster and ultimately improve your design process as a whole. So, if you’re looking for ways to organize your images better, you’ve come to the right place. In this article, we’ll share ten tips on how to organize images fast and efficiently.
What is the Best Image Organizer Tool Online?
If you are not sure how to organize images efficiently then going for an image organizing tool is the best option. Although there are a few online image organizing tools, we recommend Eagle Image Organizer. It has a simple and clean interface that makes organizing your images quick and easy. The best part is that it has a browser extension that can quickly deploy. You can either drag and drop your images into Eagle Image Organizer or add them from your computer’s file browser.
Following are the major features that can teach you how to organize images more effectively and quickly:
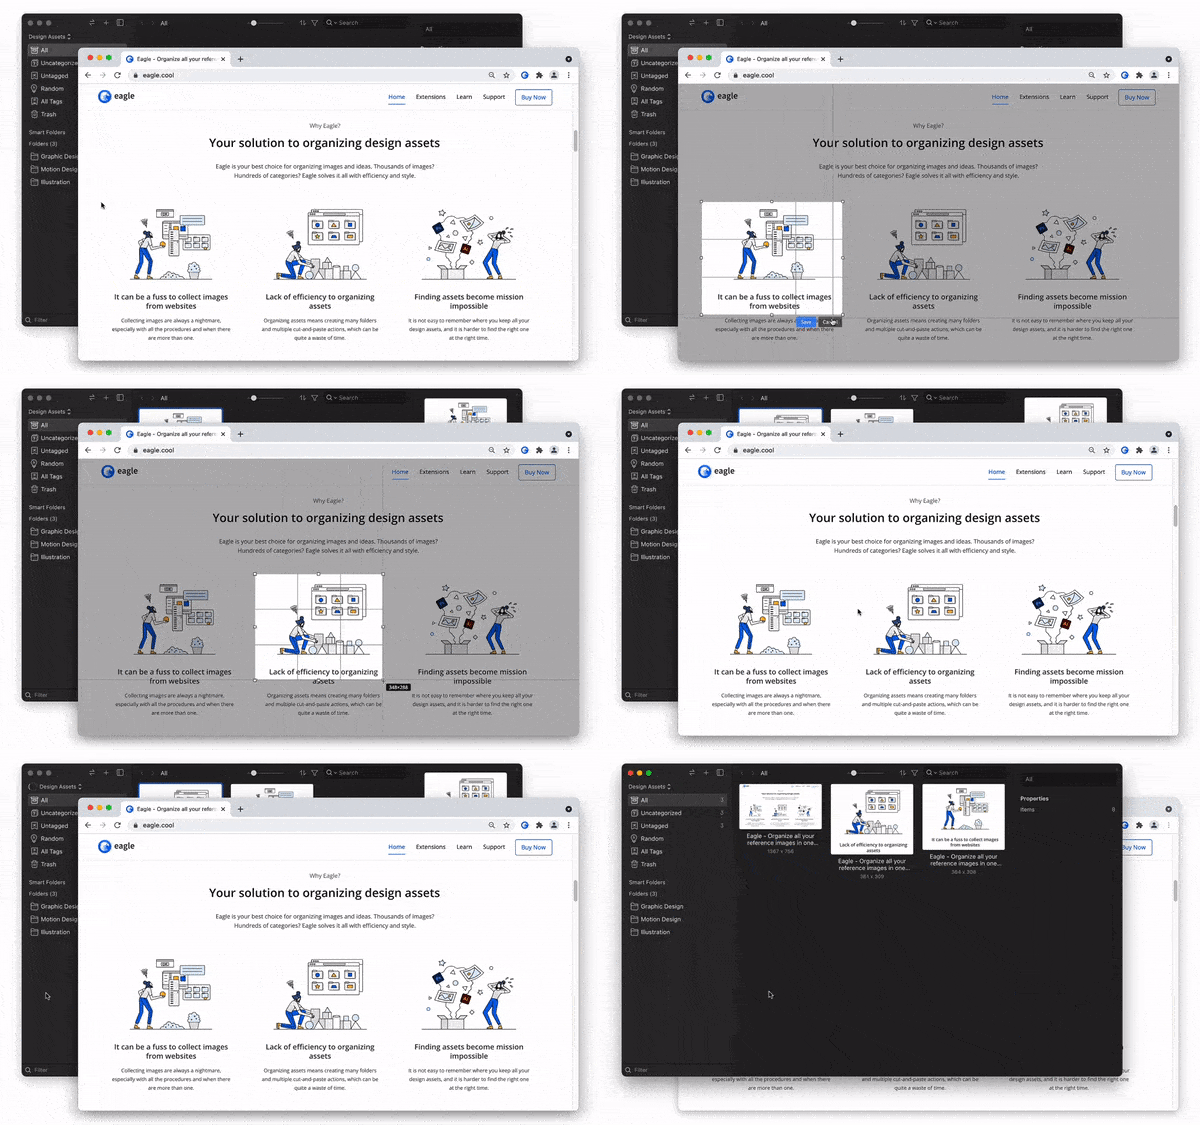
1. Capturing Screenshots:
Recording your inspirations through screenshots is a breeze with the Eagle image organizer. Simply take a screenshot of anything that inspires you, anywhere you see, and it will be automatically saved and organized in your workspace. This proves to be very helpful if you are brainstorming for your new project.
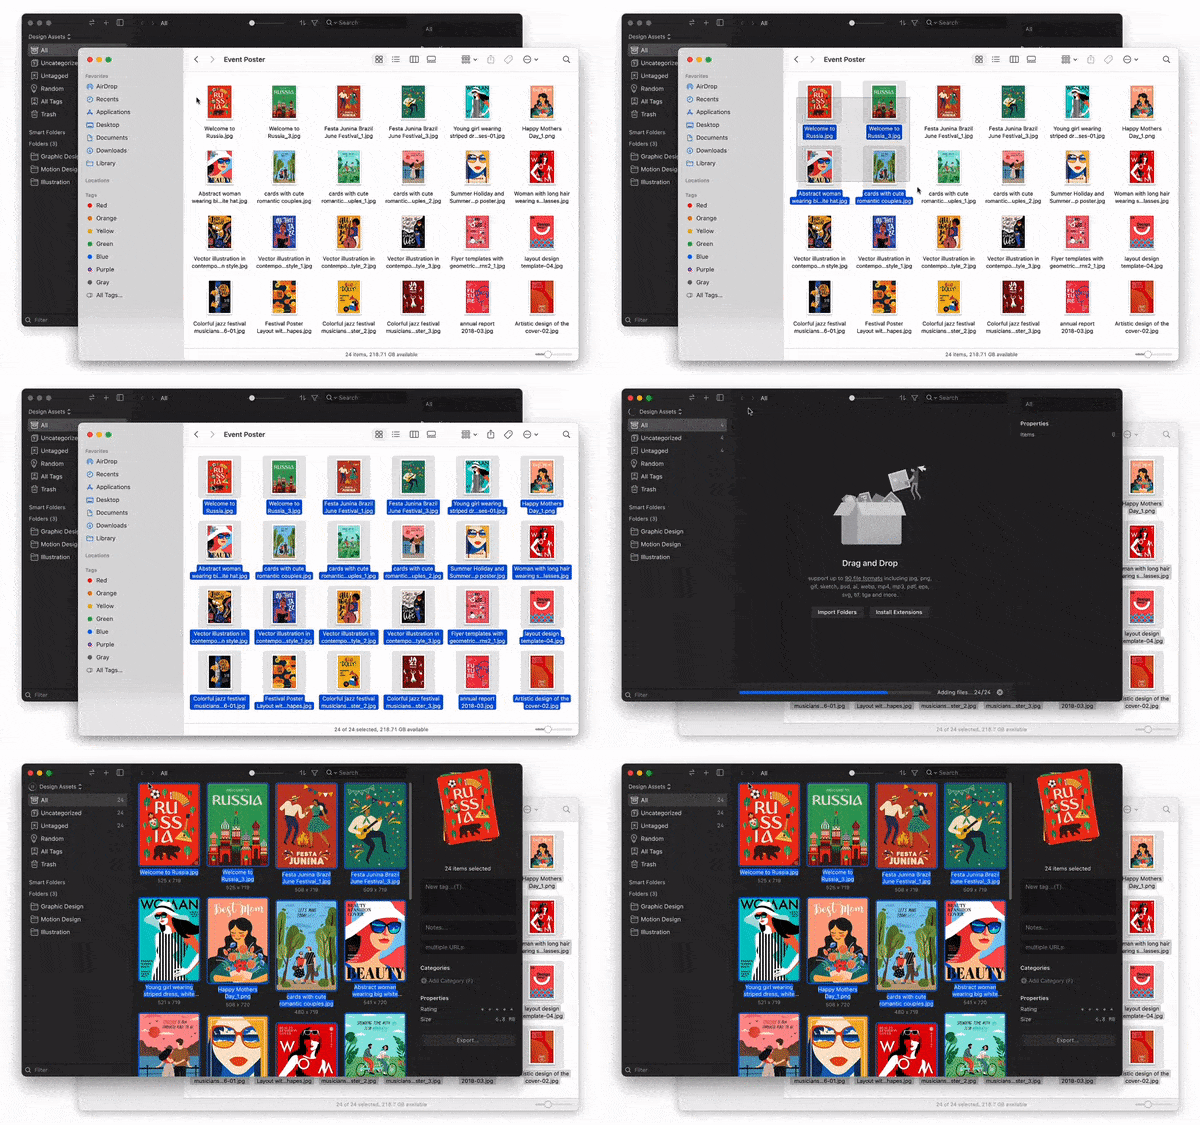
2. Drag and Drop:
You don’t have to make the effort of saving the images in folders. Eagle image optimizer supports drag and drops feature, and hence you can quickly move images around to different folders and add new images from wherever you want.
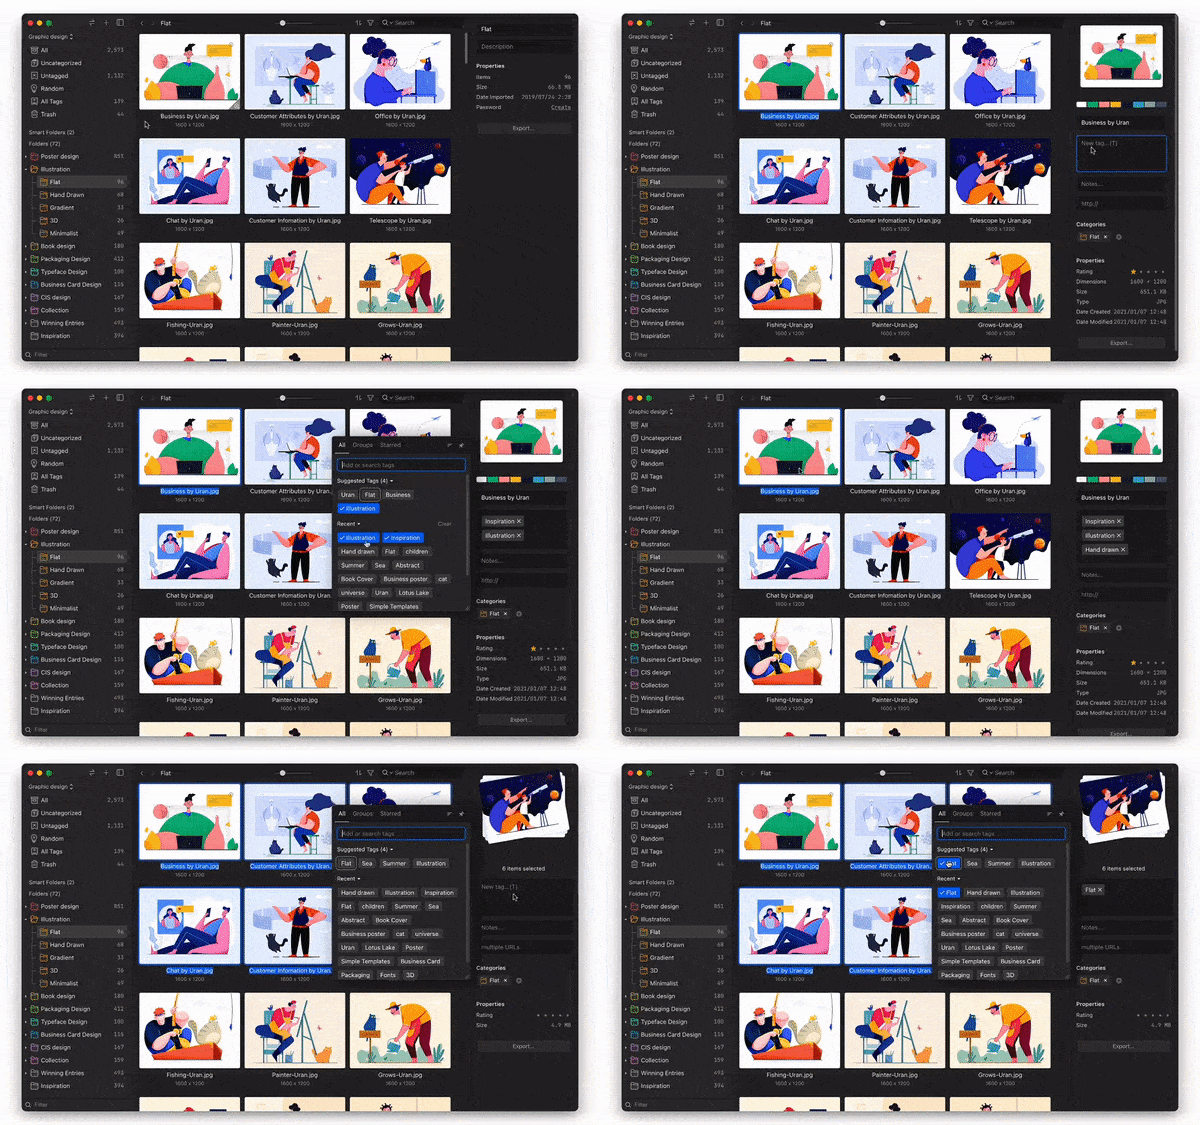
3. Tag Images:
Tagging is one of the best ways to create metadata for image classification. Eagle image optimizer is simple and easy as you can add multiple tags to images. You can also select multiple images and tag them together to keep track of what each image is for and retrieve it when you want them.
4. Smart Folders:
Creating a folder structure is paramount to good database management. But this process can be very time-consuming. Eagle image optimizer does this hard work for you by creating various intelligent folders based on their size, project, tags, orientation, and other options, making it easy to find specific types of images quickly.
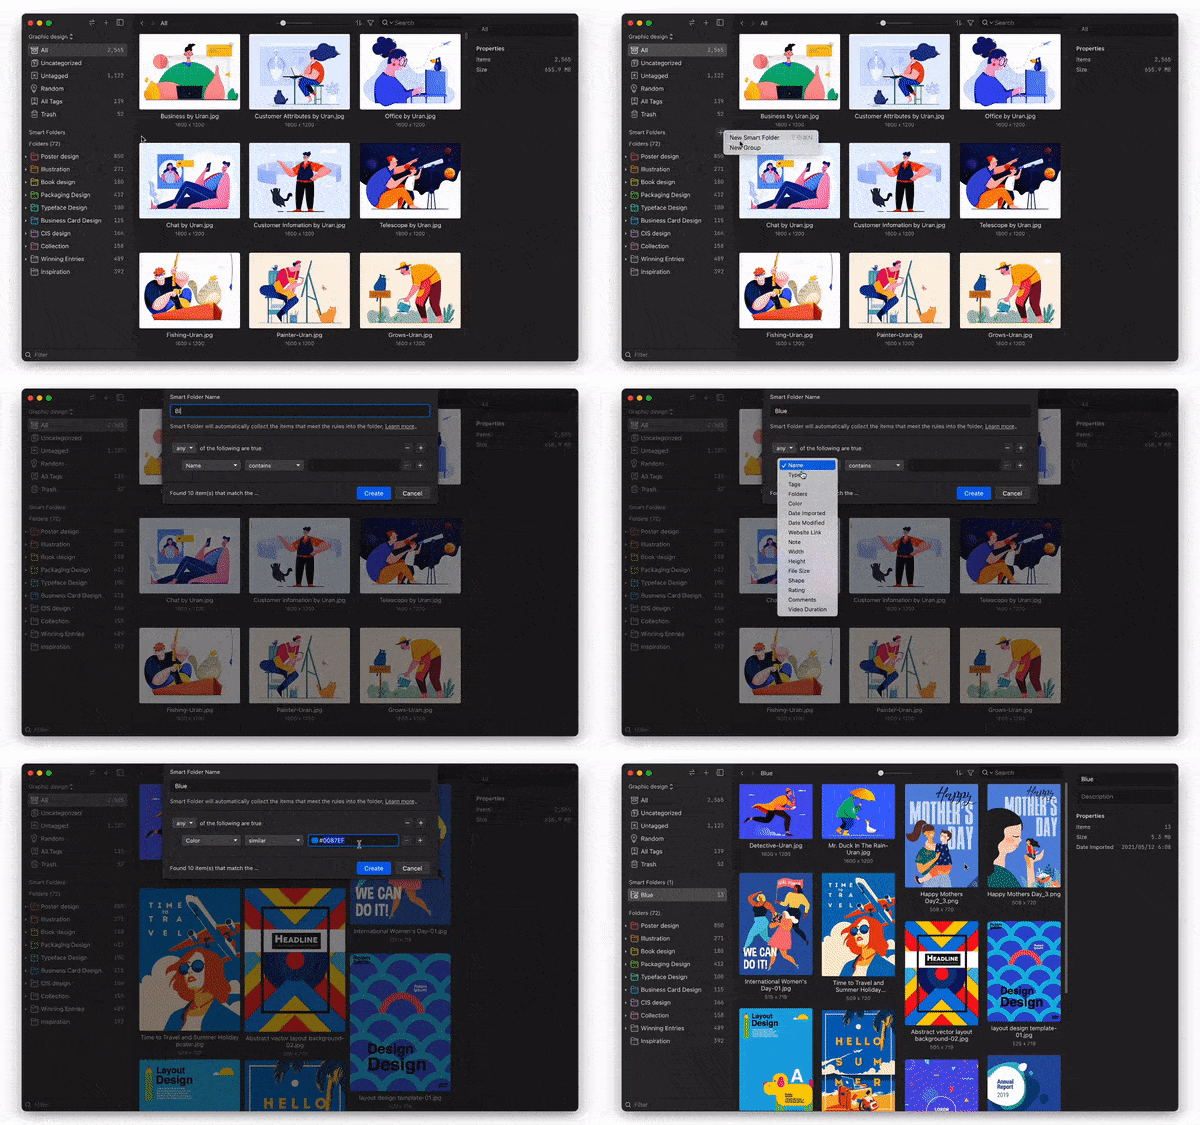
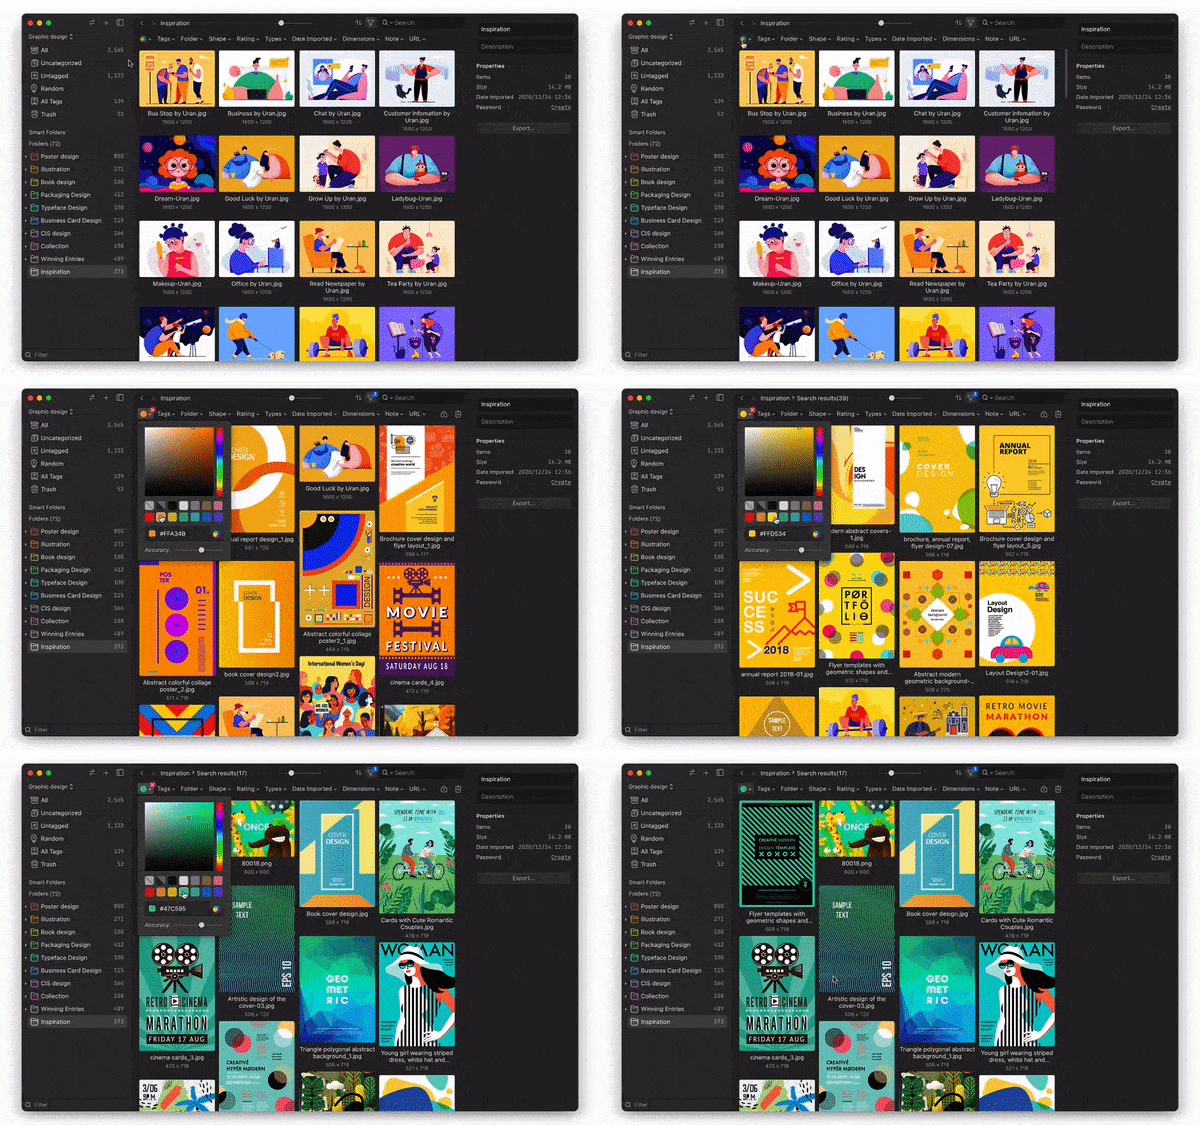
5. Color Filter:
Most of the time you know the image’s color you are looking for, depending on the ongoing project. The unique color filter of Eagle makes it easy to find images by color, so you can quickly find the exact image that you need for a particular project.
6. Advance Filter:
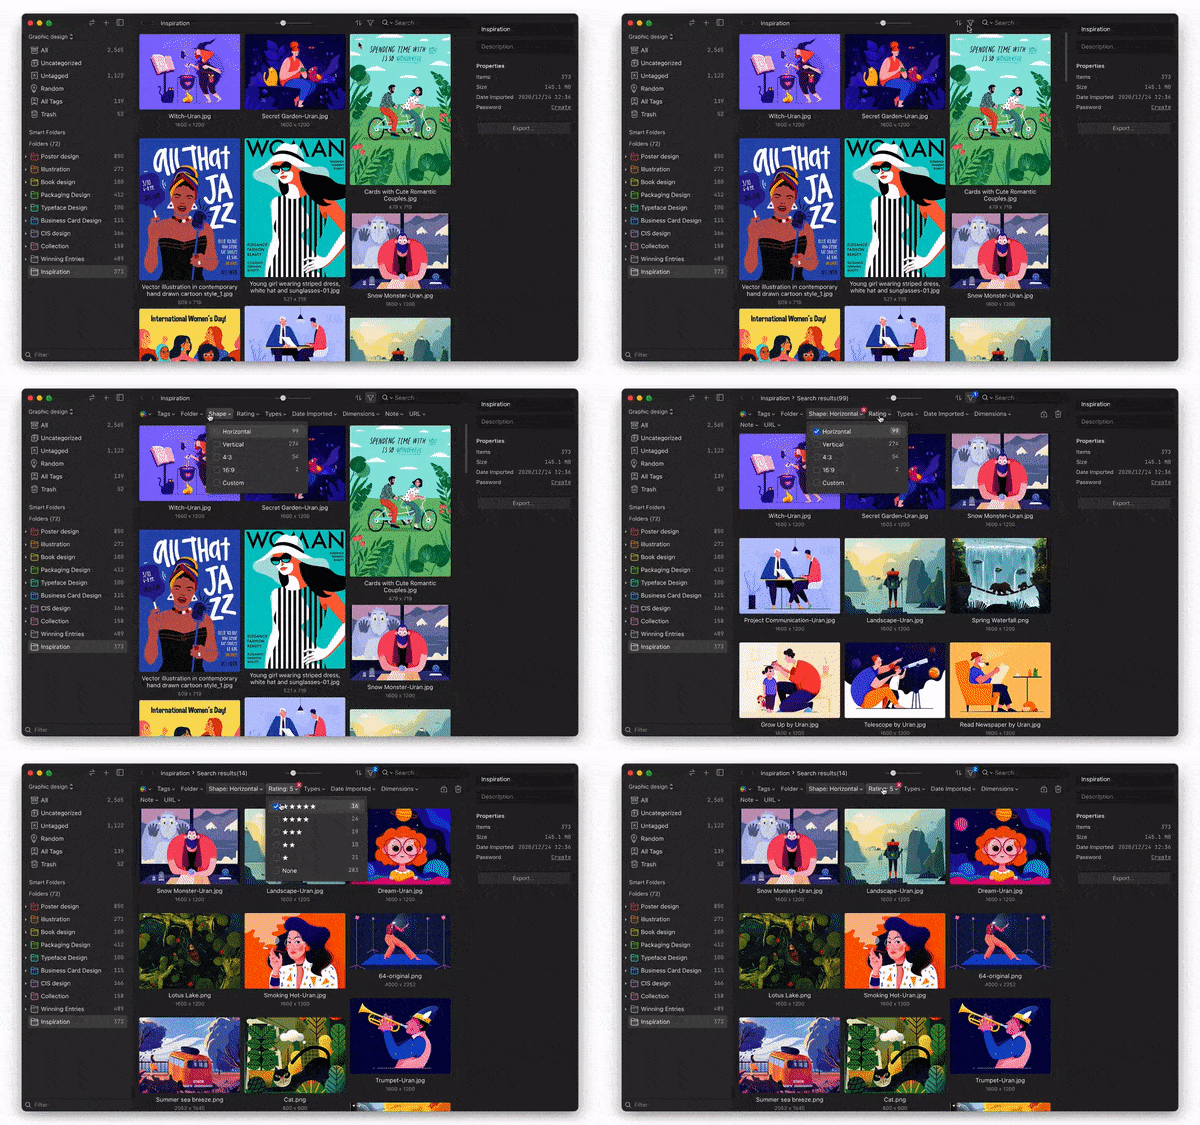
Apart from the color filter, Eagle image optimizer comes with an advanced search feature that lets you filter out images based on their orientation, size, format, and more. This makes life very easy for designers as they can use these filters to remove the images they are not looking for.
7. Different Previews:
Proper layout and preview can save a lot of time when searching for images. An extra feature that Eagle image optimizer provides is that you can preview the image in full size on mouse hover or by pressing the spacebar key. This saves the effort of opening and checking all images.
8. Organize all Design Assets:
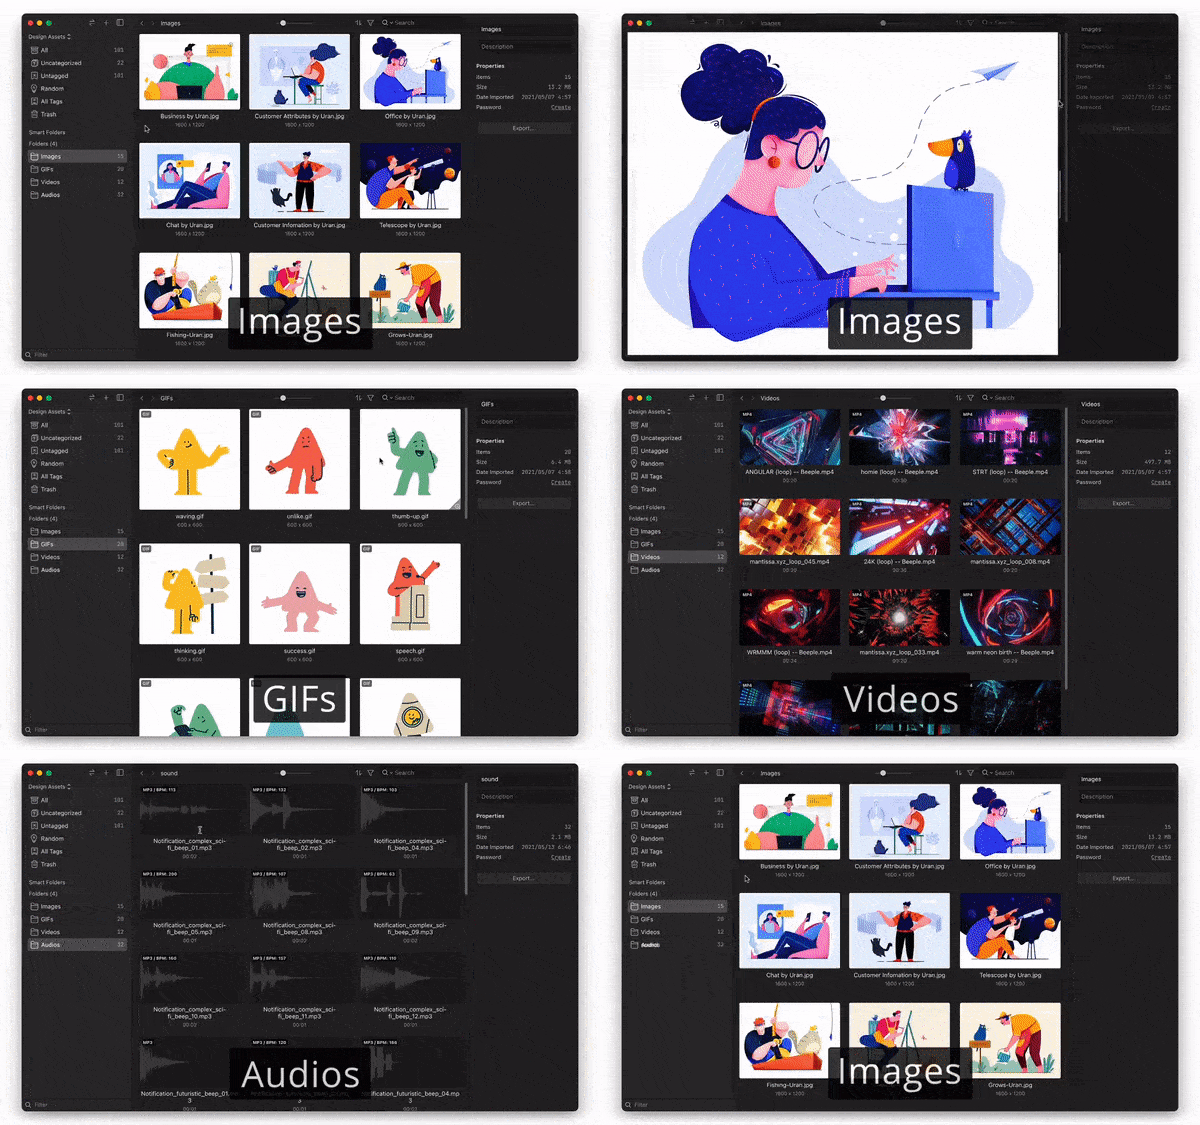
Eagle not only answers your problem of how to organize images better but also helps you organize other design assets like:
Yes, you can bookmark reference videos and Eagle will add them to the collection. This is why it has become a potent tool to help designers work efficiently.

9. Annotate Image Parts:
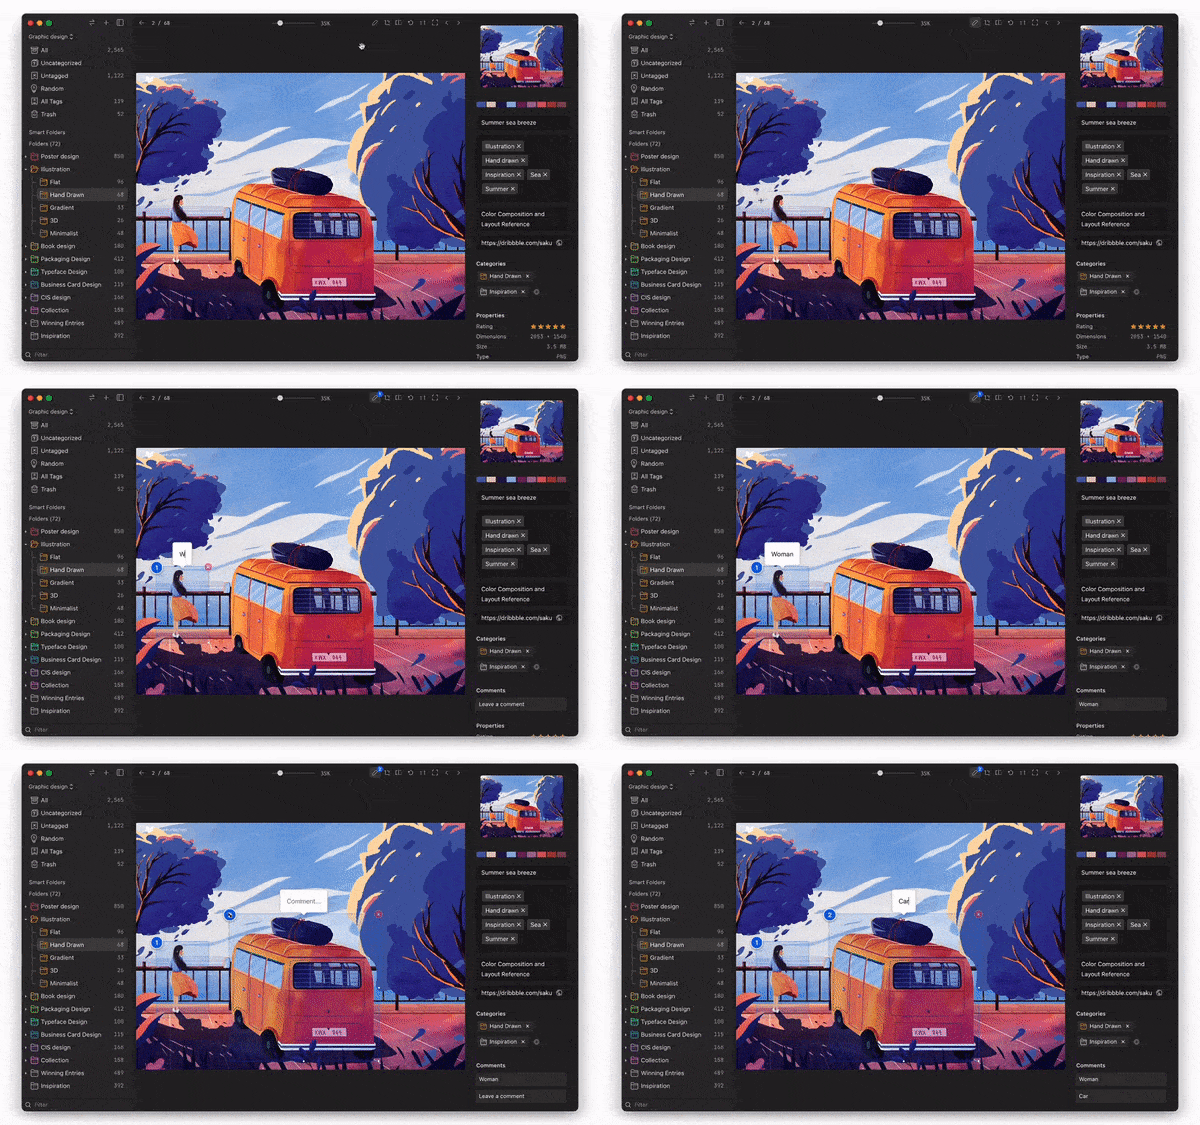
Image has multiple objects, and if you are not sure what to tag, then why don’t you tag each object in the image. This is possible in Eagle image optimizer as you can quickly add your notes or thoughts to any part of the image. This becomes a suitable tagging method as you can search based on these notes later.
10. Create Clipboards:
Starting a new project and want to create a mood board or collate ideas? Then Eagle image optimizer can be helpful as it lets you create a clipboard and copy-paste images into it. You can keep adding to this clipboard and refer to them whenever needed.
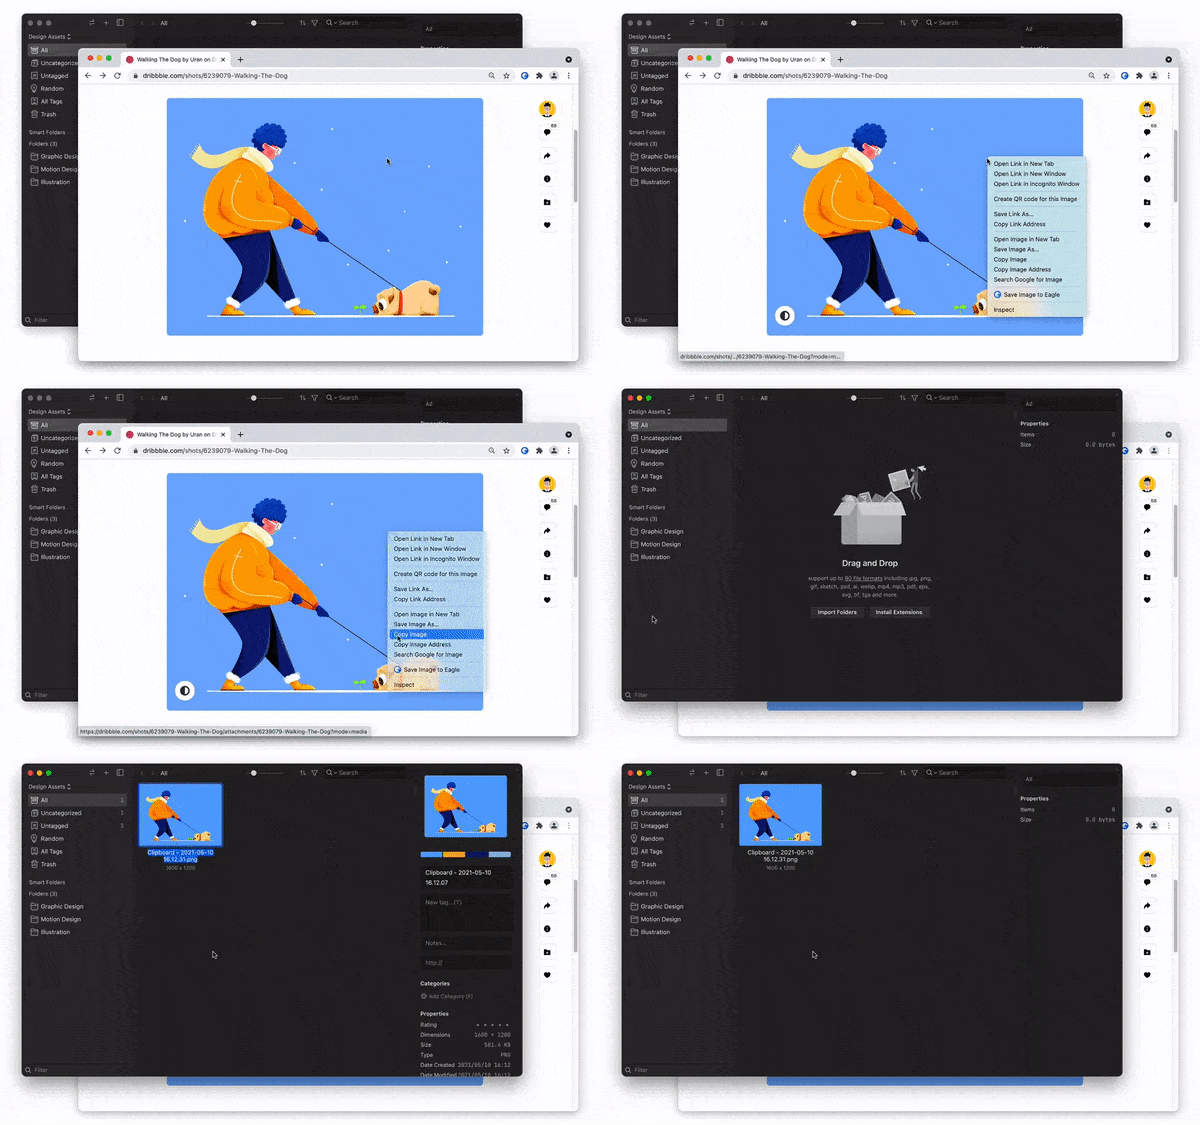
Apart from these, it also offers many other critical features like password protection, batch processing, rating, removing duplicates, and more. Whether you’re a professional web developer, graphic designer, or photographer, Eagle Image Organizer is the perfect tool for all your image organization needs.
The good news is that it only costs $29.95 and you get a lifetime of usage. Plus, you can use one license for two devices. There are no additional subscription fees, and you will have access to all new updates making it highly reliable and cost-effective.
Summary
It is important for designers to learn how to organize images in the best way possible. A well-organized collection of images, vectors, illustrations, graphics, and videos makes it much easier to quickly find the asset you are looking for, saving a lot of time and reducing frustration. With the right organizational skills, your creative process will become more efficient, and you will be able to express your ideas more effectively and efficiently. Additionally, having an organized collection of images allows you to easily share your work with others, increasing your visibility and helping you to get more clients.
