Line25 is reader supported. At no cost to you a commission from sponsors may be earned when a purchase is made via links on the site. Learn more
It is Halloween time! And having a scary makeover is a must. However, in reality, this can be very expensive and also complicated. Even for experienced makeup artists, achieving a scary makeup that passes the test of time and partying can be difficult. Thereby, we have come up with a perfect tutorial for you, which lets you create Scary Halloween Looks using these five tricks in Photoshop.
Generally, people used to dress up in only scary costumes during Halloween, but these days people experiment with different genres.
There are many ways in which you can create your scary look using Photoshop. Photoshop works best for enhancing the makeup you have done or created a new look from scratch on a typical picture. Photoshop allows for creativity beyond the reach of physical makeup. You can create some captivating images and looks using the right Photoshop tools effectively.
Here we are some tips and tricks from some prominent YouTubers who specialize in Photoshop that can help you create very scary yet creative Halloween designs.
1. Using a variety of Layers:
One of the essential features of Photoshop is layering. It allows designers to create layers of images over the other or many images over each other for creating interesting effects. By making using of layering, you can superimpose a subject’s face on a picture that has a scary element in it, for instance, we have taken an example of a hooded skull. After you superimpose the image, you need to make use of the Pen Tool and create a precise outline of the subject’s face. You can then cut this marked area in such a way that it looks as if the subject is wearing a hood.
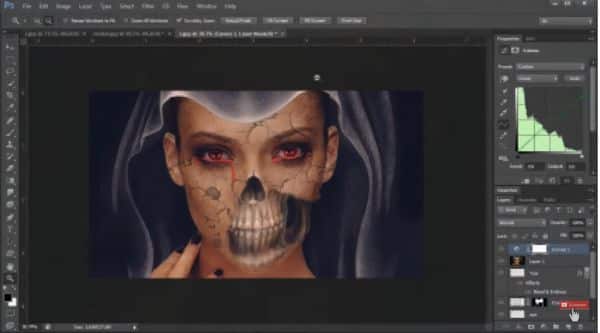
After the underlying layer has been created, you can lock that layer, and work on a new layer. Now use standard paintbrush tool and paint the eyeballs red. Go just a little out of the eyeball’s area to give an illusion that the eyes are bleeding. You can also hint blood at the bottom rim of the eyelid. Now you need to work on the lower layer. Pull it out of some regions of the face, for creating an impression that there is a skull make up. Now search for a cracked surface image, and create another layer of it. And finally, blend the cracked surface in proportion to the subjects face by fading it to match the skin texture.
2. Use Grungy Textures:
Another way of creating such creepy effects is by using textures, which opens up a world of possibilities in Photoshop. It lets you add a new perspective to your image, by adding shapes, patterns and many other pattern designs out there. This technique comes handy when you are trying to make your subject look like a zombie. This is even easier if you have a base Halloween make up, as it can enhance the look by many folds. Many times the effects to be used vary according to the makeup of the subject. Some use latex in liquid form or create blood like textures using different components. These makeups can be very helpful in augmenting the designs.
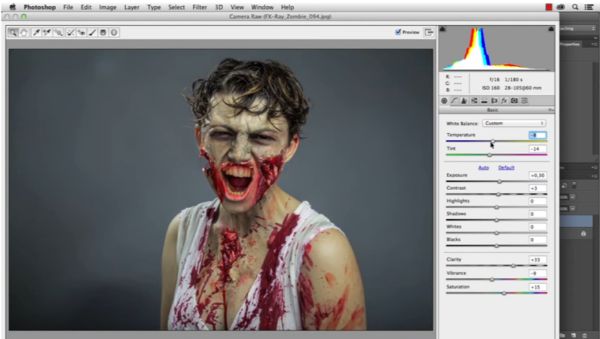
Once you have a picture of your subject with blood, makeup on their face, enhance it using the Hard Brush. By using hard brush blend pieces and chunks of skin with the background to make it look like the subject is missing out on chunks of skins. Create another layer and call it blood for easy reference, and now start painting skin covered in blood in all the areas that were blended with the hard brush earlier. It would look imposed if it’s a full-body portrait image of the subject and only their face is covered in blood and deformed. This is why you should use the same steps on the subject’s exposed areas, such as creating a chest wound by using stock images of meat. By using the colour palette, you can experiment with the tint you want to be added to the subject’s skin. By adding shadows near the eye area of the subject and pulling the lips behind the teeth and using the same meat stock image to blend the lips would give it a very crude look.
3. Try the Scary Joker Look:
Take an image of yourself as close to the reference image you want the image to turn out to be like. We are using the reference image of the new Joker character from the Joker movie. He generally wears formals, so try getting yourself clicked in similar attire, with a jacket and a shirt on the inside. It need not be the same costume. That is the beauty of Photoshop. Change the colour of the jacket to Red, by creating a new Hue/Saturation adjustment layer and clip to the base layer. Using the Selection tool, select the jacket and click the mask button. Now tweak the hue/saturation slider till the jacket turns to your desired colour, in our case Red. Copy the mask of your previous layer on a new selection of the inner shirt. Set the blend mode to Luminosity, which ensures it only affects the lighting and not the colours. Experiment with the hue and saturation slider till you get the right colour, in our case Yellow. Fix the edges with brushes if they seem rough. Using an exposure adjustment layer, you can add the top green part of the shirt in our reference image.
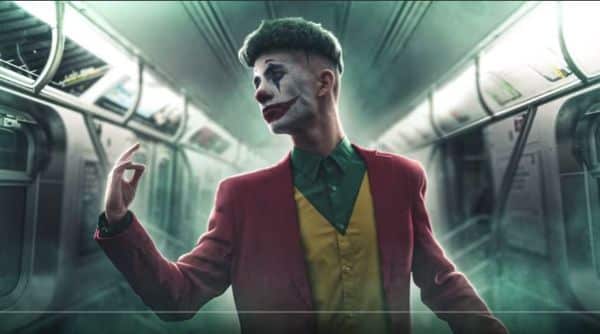
Now moving on to the face, add a vibrancy layer and remove all the colour. Create a mask for this to affect specific areas of choice. Don’t try to be too in the lines, as a messy look would look more realistic. Also, ensure you don’t cover the eyes as well. Now using the mask of the previous layer, make the grey looking face, white. Add a new Hue/Saturation layer, and make it all red and create a mask for this as well to target selected areas, i.e. eyebrows, face and nose for this look. Finally, group all the layers and covert it to a Smart Object.
4. Get the Vampire Look:
To practice, you can use a free stock image from the net. Now make a folder and name it adjustment layers. Add four layers in this folder, with the first being black and white adjustment layer. Go to the preset panel and select maximum black option, and change the opacity to 50 per cent and blend it with overlay option. Add the hue and saturation layer next, and change it accordingly to create a pale look, for which you’d generally want to increase the Hue value to a positive number and reduce saturation. Now move to the levels of adjustments layers and change the middle value to 0.80. Now the last layer will be the gradient map adjustment layer. Experiment with the different gradient options and select the one that works best for you. Now tweak the opacity of the layer to 50 per cent and use a hard light blend layer. Now, let’s focus on the eyes.
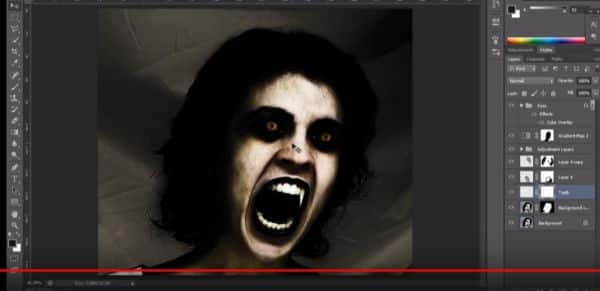
Take another free stock photo of a scary or spooky eye, using a cat’s eye, for instance. By using the, create a cutout of the eyes and add it to a new layer. Do the same for the other eye. Duplicate both the layers and add it to the original document where you were working. Adjust and resize the cat eyes on the subject’s eye and reduce the opacity of the cat eyes to see what’s behind the image. Now reduce the size of the eyeballs to fit the eyeball of the model better. Now use the brush tool for the foreground and apply it to the side of the eye to erase it. It is ideal to use brush tool for this rather than eraser tool as there’s no going back from eraser’s tool. Repeat the same method on the other eye and increase the opacity to 100 per cent. Use similar blend modes from different images to add texture on the face of the subject.
Now take the polygonal lasso tool and zoom in on the teeth, and make a selection on the tooth you want to convert into the fang. Copy and paste it on a new layer and increase the length of this tooth horizontally, and add a layer mask to the new layer and apply black colour using brush tool for shaping it in a vampire’s tooth. Set the hardness to 100 per cent and apply it carefully around the tooth. Press control +T to activate transform tool and rotate and position the tooth to put it the right orientation. Repeat the same steps for the other tooth.
5. Unzipping the Fright:
Photoshop has a zipper feature that is widely used for creating horror images for a long time. It works best for Halloween. You can use this effect along or combine with other effects. After you’re done with the basic framework of adding blood-related effects and also creating black layer near the eyes, add a very creepy zipper to your image for more effects. For achieving this look, you need to source an image of a leaf which is dark red in colour and another image of a zipper. Layer in the leaf first and then create another layer consisting of the zipper image, and position it to the centre of the subject’s face. Now use contouring to blend it around the leaf image starting from the chin and moving towards the cheeks.
Halloween is thereby the best time to use your creativity and at the same seriously improve your photoshop skills with some promising practices that refine your skills and also gives you a great look for the festival. With each look, you practice you’ll be able to blend in all the elements more smoothly and create more interesting looks. Keep practising.