Line25 is reader supported. At no cost to you a commission from sponsors may be earned when a purchase is made via links on the site. Learn more
Who does not like clear skin? But few people are gifted with naturally glowing skin that is flawlessly clear. Everybody wants to achieve flawless skin, but not many of them are fortunate enough to have it. Some take makeup while others choose to use Photoshop to retouch their pictures and make their skin look flawless. Adobe Photoshop is a powerful tool that can help you clear up your skin with a natural finish. The finish is so natural that you would never know if a photograph is retouched. This blog focuses on the tips to get skin smoothening and retouching right in Adobe Photoshop. Let us look at how we can do it.
1. Create a copy of the original image:
The instructions that we are going to look at here are compatible with Adobe Photoshop versions six and earlier. You can see the photograph on the background layer present on the Layers panel, when you import the image to the program. Remove unwanted blemishes first before, and then you can switch to smoothing the skin. Create a copy of the Background layer. To do this, you can press and hold the Alt and Win key on the keyboard, press on the Background layer, pull it to the New Layer symbol placed at the Layers panel’s bottom area.

Now rename the duplicate layer as “Spot Healing” in the Duplicate Layer box. A new copy of the image appears on the top of the original image with the name “Spot Healing.” The necessary cleaning of the skin is going to happen in a separate layer.
2. Make use of Spot Healing brush tool:

Go to the toolbar, and click on the Spot healing brush to start with the process. A spot healing brush tool is used to remove blemishes and skin imperfections. This tool works like the healing brush tool. It colors the selected area of the face with the sampled pixels and matches the skin’s texture. The tool offers skin lighting, transparency, and shading of the sampled pixels to the pixels that need healing. But there is a difference between the Healing Brush tool and the Spot healing brush tool. The spot healing brush tool does not require a sample point. It automatically samples the pixels from the retouched area of the skin on the face.
3. Use Spot Healing Brush’s “Content-Aware” option:

There are three types of options available with the Spot healing brush tool:
- Proximity match: This option takes up the pixels around the selected area’s border to find the pixels to use as a patch.
- Create texture: It takes up pixels from the selected area to create a texture. If it does not seem to work, try selecting the area again.
- Content-Aware: Compares the nearby image content to fill out the selected area seamlessly. It maintains the essential details like shadows and edges of the objects.
Here, you have to select the “Content-Aware” option in the Options box. The default selection is “Content-Aware.” Hence, you have to confirm that the selection is on the said option.
4. Eliminate Skin Blemishes by clicking on them:
Now that all the parameters of our Spot healing brush are set start clicking at the points on the skin to remove all the unwanted blemishes of the skin. With this, Photoshop replaces the problem areas of the skin with the fair textured skin. This is taken from the neighboring area of the skin.
To make the process easier, make sure that the brush tool’s size is a little larger than usual. This makes a point to cover the blemishes effectively. Use the right box bracket key (]) to enlarge the brush. Subsequently, use the left bracket key to decrease the size of the brush. If partially, the blemish is still there, undo the click by pressing Ctrl+Z from your keyboard. You can resize the brush to target the leftover blemish.
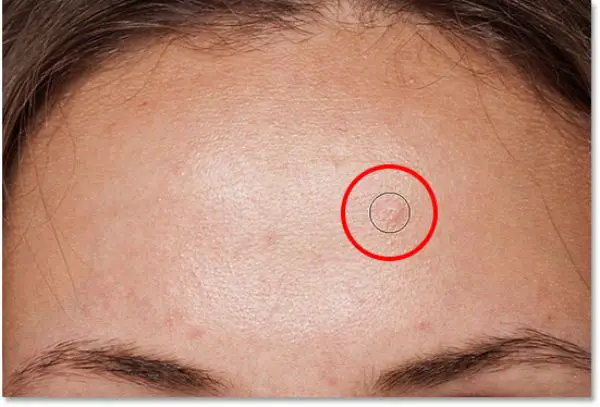
The image here is of a woman with certain skin imperfections. A small glimpse at the image here shows a massive breakout in the center of the forehead. You can put the spot healing brush after that, enlarging the brush and remove the imperfection by clicking over it.
Once you do this, the click is analyzed by Photoshop, and it finds the excellent texture of the skin based on the neighboring area. It then blends the excellent texture with the problem area and color. And the blemish disappears like a miracle.
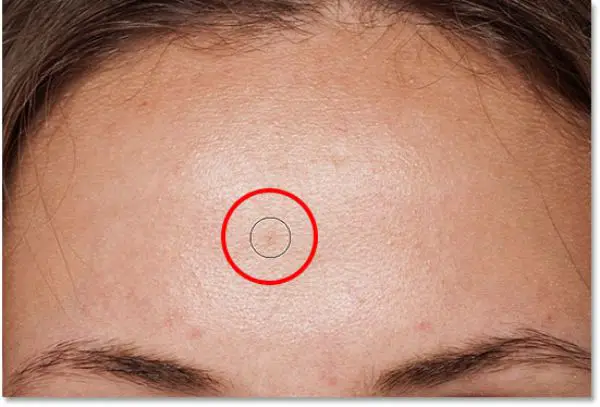
We are going to do a similar thing again with other imperfections on the forehead while maintaining the large size of the brush to target the area correctly.
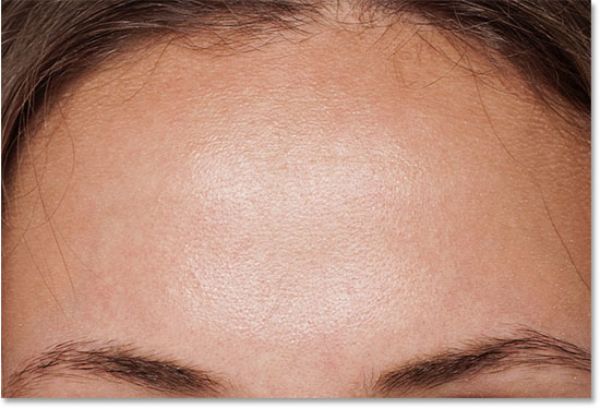
With a few clicks here and there, all the selected blemishes and imperfections are targeted. This results in a smoother looking skin that has an unmistakable glow without any imperfections. Take a look at the result:
As you retouch the skin, you have to be careful about not working on the mole and certain permanent scars. Moles and scars are the permanent features of a human face, and they should never be removed. The aim of skin retouching should be removing skin imperfections and problems. It should not make the human look like another human being.
Continue following the above steps for the rest of the face to eliminate all the leftover blemishes. Let us see the face’s comparison before removing the blemishes and the one after all the blemishes have been dealt with.
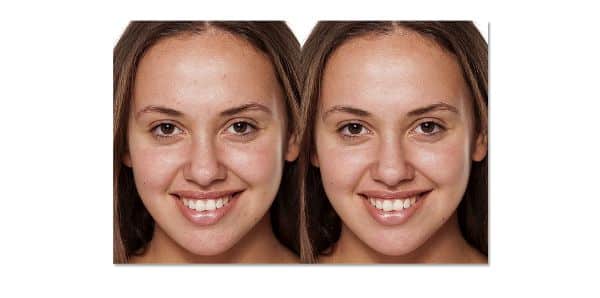
The image on the left is the original face with the blemishes and imperfections. And the image on the right shows the face without skin problems and blemishes. Mostly with the pictures, the cleaning up of the skin does not take a lot of time.
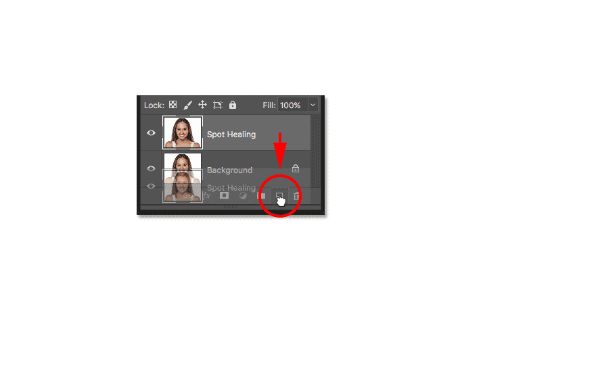
5. Create a duplicate layer of the layer labelled “Spot Healing”:
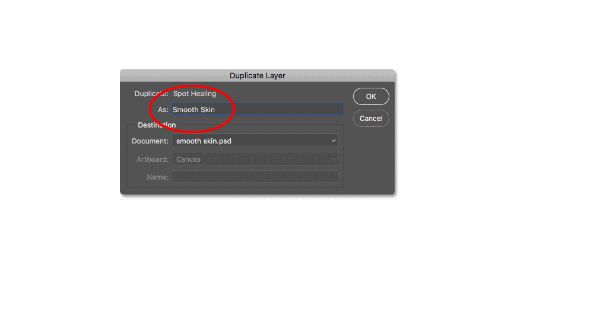
Now that we have removed all the blemishes from the picture, we can now turn to smoothen the skin. But to do this, you have to generate a different layer. Hence, here we are going to create a copy version of the “Spot Healing” in the Layers panel. This can be done by pressing and holding the Alt key on the keyboard, clicking on the “Spot Healing” layer, and pulling it down to the New Layer icon.
Label the layer as “Smoothen skin” and click on the OK button.
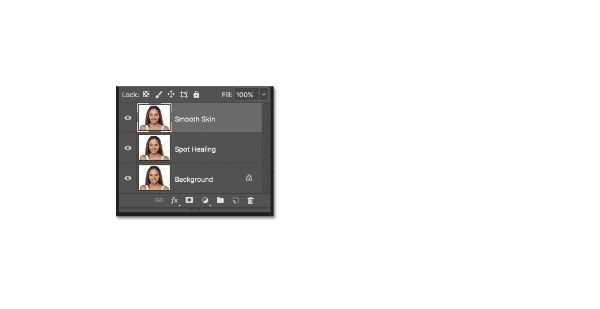
We now have got the initial image on the Background layer, while the skin cleanup lies on the Spot Healing layer and the “Smooth Skin” layer rests above both of them.
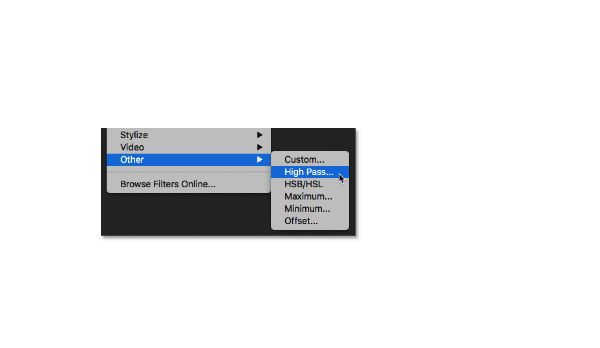
6. Use the High pass filter on the image:
Photoshop’s High Pass filter can be used to smooth out the skin imperfections to make it look healthier and glowing. Open the Filter menu, choose Other and then choose High Pass:
The High Pass filter in Photoshop is generally used to sharpen the images to a certain extent. Here we use the filter not to sharpen the skin but to smooth it out. But the steps are almost the same in both cases. This filter highlights the edges of the image. Here is an edge where there is a sudden alteration in brightness or color levels between the adjacent pixels. In the portrait mode, generally, the face of the person is up close. With such an image, the edges are generally found around the person’s hair, eyes, and mouth.
In contrast, the skin’s texture does not have too much detail and generally has smoother transitions between different areas of it. Such areas are not considered as edges. Hence, the High Pass filter does not highlight these areas; instead, it fills the area with neutral grey.
If we had used the filter to sharpen the image, the High Pass filter is capable of leaving the skin texture unaffected while sharpening the edges. Hence, to smooth out the skin, a High Pass filter can be used oppositely. To smooth out the skin, we would work with the High Pass filter in the areas except for the edges. Let us take a look:
Radius Value:
The High Pass filter is the best tool to highlight the edges of an object and correct them. Beneath the High Pass dialog box, you can find the Radius option, which controls the edge highlighting width. Once Photoshop finds and detects the edge, the radius value lets us know about the number of pixels. These pixels are to be included on both sides of the edge. The low radius value highlights the finer details in the image. But you don’t have to soften these essential parts of the image. And we have to highlight the areas around them, and we require a higher radius value for that. Hence, if we are considering a portrait image, the radius of 24 pixels generally works best.
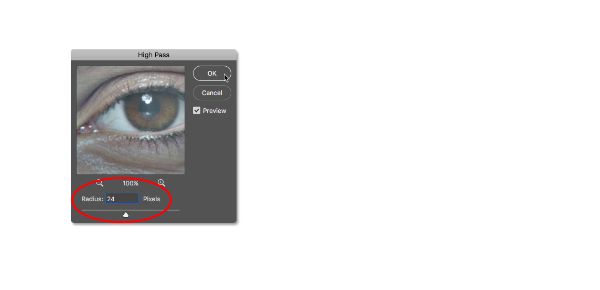
If the image’s subject is a little further back or the image has a low resolution, a smaller radius value (around 15 px) should be taken. The picked value has to be a divisible of 3. For example, 24 is divisible by three, which brings eight as a result. We are going to understand the significance of this in the subsequent step.
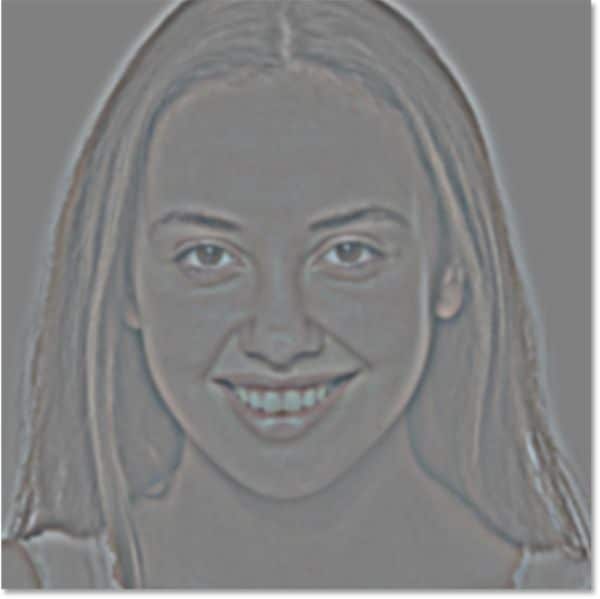
Now press the OK button to close the High Pass dialog box. Once you do this, you can see that the image has turned grey. Grey substantial areas are the areas with no edge, which has minimum detail. But the areas that has high contrast halos would help highlight the edges of the image.

7. Make use of the Gaussian Blur Filter:
Now, we have to blur out the High Pass filter effect. This may look like it is counterintuitive, but blurring it out can make the skin’s excellent texture stand out. To do this, open the Filter menu, select Blur, and select Gaussian Blur under that.

In the dialog box that appears, adjust the Radius value to 1/3rd of the previously used value. Here, we set the High Pass value to 24 px. So the radius value here would be 8 pixels. Click OK.

As the Blur is applied, the High Pass effect looks like this:
8. Use Linear Light Layer Bend Mood:
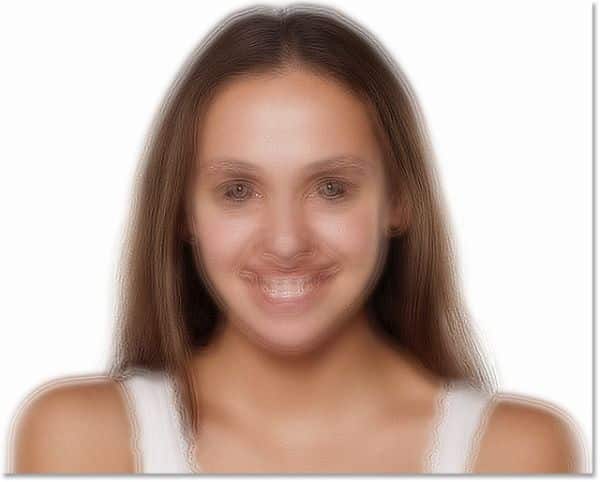
In the layers panel, turn the Blend mode of the “Smooth Skin” layer to Linear from Normal. This blends the High Pass result with the image, which creates a high contrast image with over-sharpened effects.
9. Layer needs to be inverted:
Go to the Image menu, select Adjustments, and then select Invert. Once you do this, the image becomes a complete mess and a lot more blurry than before.
10. Go to Blending Options:

To diminish the halo effect, select the Layer Styles icon at the bottom of the Layers panel and choose Blending Options.
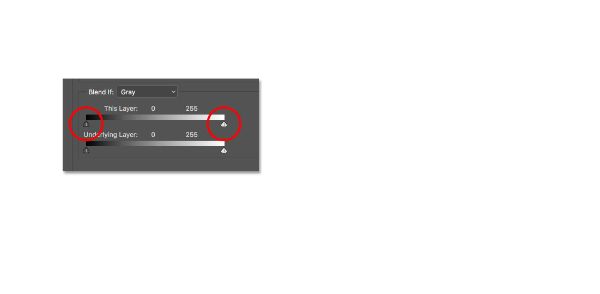
11. Drag the Blend If sliders:
Open the Layer Style dialog box and look for Blend If sliders at the lower half of the box. You can see two group of sliders: “This Layer” & “Underlying Layer.” We have to target the top slider.

See the slider beneath all ends of the gradient bar. These sliders help control the blending between the “Smooth Skin” layers to the image beneath it. This is done based on the brightness levels of the layer. The slider on the left blends the darker areas while the lighter areas can be blended using the right slider.
Working at the Light Halos:
Begin by working on the lighter halos. Press and hold the Alt key on the keyboard, click the slider on the right and drag it to the left. The slider is split in half, and hence only the slider on the left moves. It does not affect the half slider on the right. You can see the halos disappearing from the image. Drag the slider to the leftmost part of it to reduce the halos as far as possible.
Reducing the Darker Halos:
To make the darker halos disappear, press and hold the Alt key on the keyboard, click the slider on the left, and drag it to the right. You have to drag it to the right as far as possible to remove the darker halos. Click OK when you are done with the process. Look at the resultant image below:
12. Adding a Layer Mask:
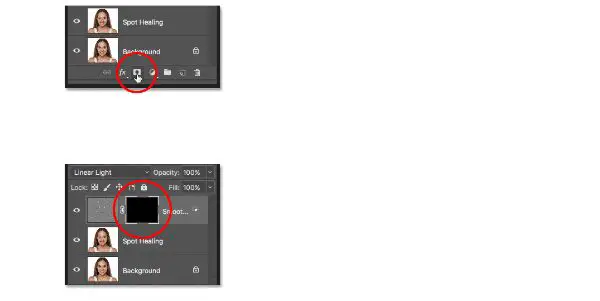
To limit the above-seen effect, you have to add a new layer mask. Open the Layers panel, press and hold the Alt key and click the Add Layer Mask icon. As you do it, a black-filled thumbnail for layer mask shows up on the “Smooth Skin” layer.
13. Select the brush tool:

Select the brush tool from the toolbar.
14. Set white color for the brush:

Make sure that the color of the brush (foreground) is white. You can look up your color swatches to check the foreground and background colors.
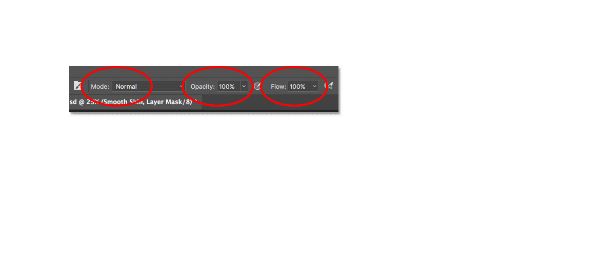
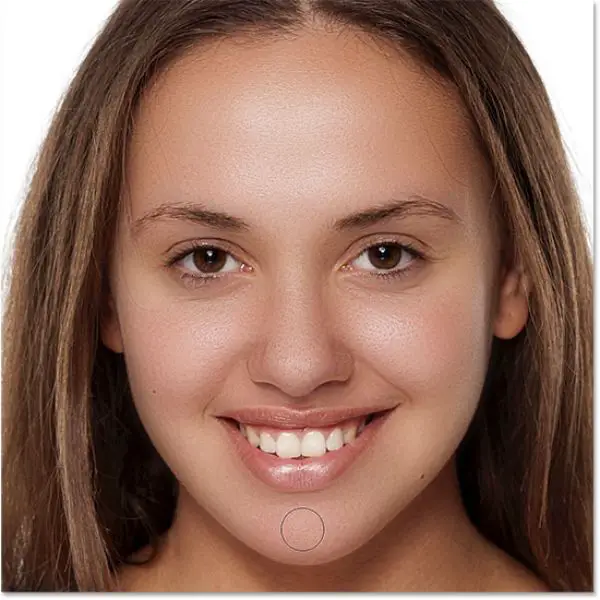
15. Paint on top of the skin:
Before you start painting, check the brush options available at the Options bar. Make sure that Mode is set to Normal, Opacity is at 100%, and flow is set at 100%. Start painting on top of the skin to bring about the smoothing effect. Pick up a soft-edged brush to make the transition look smooth.
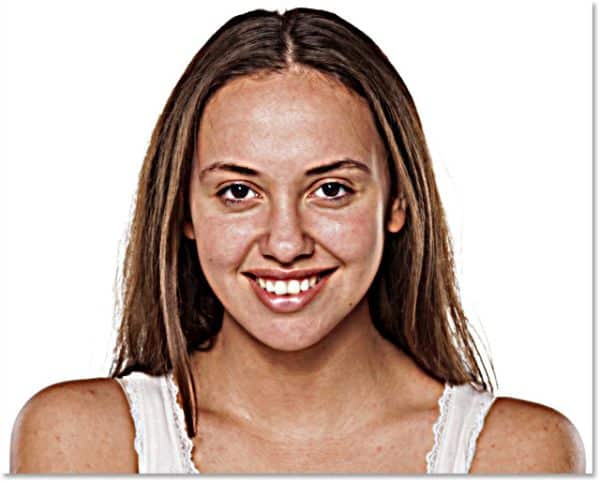
Once you are done painting, you can see the image. Check the below image to see the result of the entire process.
Conclusion:
This article here can guide a newbie to smoothen and retouch the skin using Adobe Photoshop. You can take up all the tips and tricks here to successfully retouch an image.