Line25 is reader supported. At no cost to you a commission from sponsors may be earned when a purchase is made via links on the site. Learn more
What goes into designing a successful sticker? More than you might think. A successful sticker design is one that serves the purpose you intended for it, and that purpose isn’t always easy to measure. Stickers can be used for so many things, it could be advertising, product labels, attractive customer freebies – anything.
From the purpose and concept to the technical details like typography and resolution, here’s each element of sticker design broken down, so you know exactly what to do next.
1. What is the purpose of your sticker?
Don’t design a sticker without having a clear purpose. For your design to be successful, you need to know what it’s for. Each context may require a different approach.
Let’s say you designed and printed stickers with only your logo on them. Even if you follow all the design steps in this guide, it would still just be a sticker with your logo on it. Not great if you want to grab attention in a marketing campaign.
As part of your marketing strategy, specify what your stickers will be used for – and where they will be used. You’ll also want an idea of how many stickers you want printing.
Once you’ve figured that out, you’ll know what tips would be most beneficial to use in the design process.
2. Pick a size that fits your purpose
When you think of stickers, you might think of something small. But these days, you can get stickers printed in almost any size. You could have an entire wall covered with one sticker.
Once you know the purpose of your sticker and where/how you’re going to use it, measure up the area so you know what size you want it to be. You can then set your size in the design software you use, or pass it on to your designer.
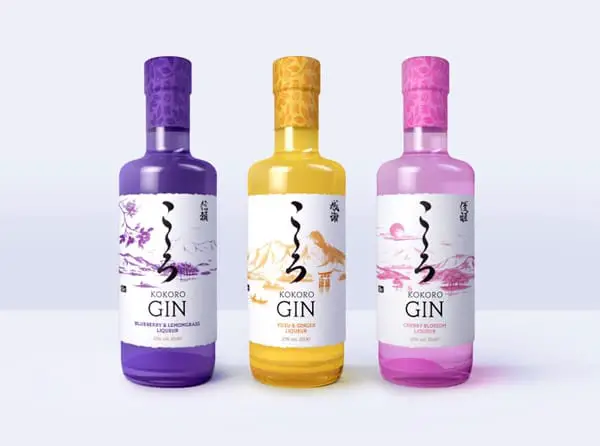
The example below is a custom sticker used as a product label. You’d want to know the circumference of the bottles along with the height, and then decide how much vertical space you wanted the label to use.
3. Choose your shape
You can get your stickers cut in any shape. Stickers are most commonly cut in square and rectangular designs, but this all depends on the purpose of your sticker. Unconventional shapes usually cost more as they require custom cutting.

4. Concept design
In the concept phase, create a rough outline of what you want. Brainstorm some ideas and think of a few designs. You don’t need to be a professional artist in this stage, but it’s essential you have an idea of your design – and, that you’re open to changing it at a later stage. A designer may not always know what angle is best to take at the start, so coming up with an initial concept can help set the tone for the rest of the design process. This is where good old-fashioned pencil and paper comes in handy. Jot down some rough sketches and ideas, then it’s on to the next stage.
5. Outline
This is where your designer might take over the process. But you can always try your hand at this if you’re tech-savvy. Most artists create a rough sketch of the design in software, then draw back over with well-defined lines.
If you’re looking to make a label quickly, without design knowledge, have a look at Adobe Express, which is free to use. There’s also Canva, an intuitive browser-based tool. If you want more control over the artistic process, you’ll want a more complete software design package. To make a professional sticker design, you can try one of the following:
Inkscape (free)
In the above software programs, you can save the file in vector format, which will allow you to scale the image to any size without the loss of quality. We’ll talk more about what formats are commonly used when it’s time to print.
6. Pro design

If you’re looking for a solid, professional design, hire a professional designer to avoid disappointment. You can always try your hand with one of the free tools above though. Although limited, they sometimes do everything you need, saving you money.
Reach out to other professionals in your network and see who they recommend. Another way to find a pro quickly is to use a freelance marketplace like People Per Hour.
By hiring a pro designer, you’re setting yourself up for a successful sticker design. And of course, you avoid the embarrassment of having a terrible design if you have no idea how to do it yourself.
7. Typography
Typography is the art and technique of styling and arranging letters so they are appealing and readable, and it’s often overlooked or misunderstood.
Use an attractive, readable font
Don’t sacrifice readability for a fancy font that no one can read. By the same token, don’t make it boring, or commit the sin of using Comic Sans, unless you’re writing for children.
Make your typeface attractive, powerful, and aimed at ‘your crowd’. Choose something that can be seen from a distance. Go with something readable with a bit of character.
Test different font weights
The weight of your font is its thickness. All software allows you to tweak this. Most stickers with writing on use thicker, bold font weights for clarity and impact. But, depending on how much text there is, you might want to vary this between different words or lettering.
Letter arrangement
The way the letters are arranged affects the clarity. The letter arrangement can be anything from the line and letter spacing to the vertical, horizontal, and diagonal positioning of the letters. Once you’re happy with the readability and appearance, you’ve nailed an essential element of sticker design.
8. Create an impactful message
If you’re using words on your sticker, every word matters. With limited space, you must craft a clear and compelling message. This all depends on the purpose of your sticker as mentioned earlier. If you’re offering a promo on a product, make it clear with both the words and typography. If it’s an advertisement, say something simple but appealing – or thought-provoking, to get attention.
You could also consider hiring a copywriter to do the writing for you.
Whatever it is you’re trying to say, say it concisely and plainly.
If you’re not using words as a key part of the message, the sticker must at least feature your logo or some way of contacting you. The image must speak for itself, and invoke a sense of curiosity that compels the viewer to investigate further.
9. Use bright, bold colors
The way you use colors is essential for a successful sticker design. Make them bright and bold so they jump out of the sticker. People like colors that appeal to the senses. Ensure the colors match or complement your other brand marketing material.
There are some great online tools you can use to develop a palette of complementary colours. Take a look at these three:
- Coolors – automatically generates color schemes
- Canva – generates a color scheme based on your image
- Paletton – use various methods to fine-tune your own color palette
10. Save it in the right format and size
If you’re sending your stickers off to be printed, or even printing at home, you’ll need to make sure you set the correct resolution and file format. Setting the incorrect resolution, or altering the image size of a file that isn’t a vector, will distort the image and result in a low-quality print. Follow the recommended tips to ensure you get a crisp, high-quality sticker design.
Resolution
Most professional sticker printing companies will have a preference for certain file types, and also a minimum DPI. Images you see online are usually 72DPI, but the standard resolution for printing a sticker is 300DPI, and it can go much higher. Set your DPI to 300, but run this by your sticker design company in the case that they have other options.
Format
You must save your sticker file in either an uncompressed format or a format with lossless compression. Lossless compression means the image file size has been reduced, but the quality remains the same.
Recommended formats: EPS (vector), JPEG, TIFF, PNG, PDF.
11. Print on the right material
Picking a material that suits your design is all part of making a lasting impression on the viewer. Think about what message you’re trying to convey. Are you selling a premium product? Do you want something that will reflect to catch a person’s eye? Have a look at some of the materials you can print on below.
Matte
Matte stickers don’t reflect in the light. This is one good choice if you’re aiming for something premium or sophisticated.
Clear
Transparent vinyl stickers are great if you want a portion of the sticker to be clear.
Gloss
Glossy stickers are a popular choice because they produce a shine that catches the eye. After all, people tend to like shiny things!
Metallic
Polished or brushed metal stickers are also a premium choice, offering a sleek appearance to the viewer.
12. Set it up correctly for printing
You can’t print professional-grade stickers at home without professional equipment. For the best chance at making a successful, high-quality design, consider using a sticker company who have all the right tools.
Bleed, trim, and safe area
The bleed is the excess material outside the trim that will be removed in the final design. The trim is the extra space just outside the safe area, this is the outer region of your printed design. And the safe area is the space within both of these outer areas, which is slightly less than the finished size. You want to create a design that goes beyond the safe area, up to the trim, to avoid unwanted white space in the final design.
These all need to be set up correctly to ensure the design comes out exactly as you imagined it. This is something you should discuss with your sticker design company, as requirements may differ.
Conclusion
As you can see, there’s a lot to take in. The purpose, concept, design, and execution process can seem overwhelming. But it’s not as complicated as you might think, you just have to follow the steps in this guide and employ some of your own creativity. In the process, you’ll learn how to produce a successful sticker design from scratch, which is a great achievement.
You’ll most likely be consulting a sticker design company to print your stickers. Here’s the key information you should run by them:
- Their preferred file formats
- What resolution/DPI to save your file
- What are their bleed/trim requirements are
Ultimately, how successful your designs will be, comes down to how much you follow the best practices of marketing, design, and other specialist areas.