Line25 is reader supported. At no cost to you a commission from sponsors may be earned when a purchase is made via links on the site. Learn more
Tattoos have existed in all cultures for centuries. Before, they were used to mark religious symbols, but as we progressed into the millennial world, tattoos are a fashion statement as well. ‘Getting Inked’ is a famous phrase which is used extensively on social media platforms when someone is getting a tattoo.
While most of the time tattoo artists customize designs according to your needs, it is always a plus point to know that you could do it yourself as well. Designing a tattoo is super-easy if you have access to Photoshop and Illustrator. And it’s always an additional benefit if you can create illustrations. However, even if you don’t illustrate, there are ways to design your tattoos using existing stock images.
When it comes to designing tattoos, one must keep in mind that the entire struggle relates to the kind of effect and editing you chose for the image. You can go for a shaded look for black and white line drawings, or merge a couple of images to acquire the desired effect.
In this blog, we shall learn how to design a tattoo in Photoshop and how can a tattoo be added over an image using Photoshop. While both these processes are elementary, one can also choose to make complicated designs after viewing these few points.
1. How to Design a Tattoo in Photoshop:
Designing a tattoo in Photoshop is hands-down one of the most straightforward task. Most of the job revolves around choosing the perfect blend mode and making the coverage of images look realistic. Following this video tutorial by Anrijs Straume Tattoo on Youtube, we can understand how to create a tattoo that is realistic and ready to print and use immediately. Let us take a close look at the steps that are involved in the process:
Step 1 – Selection of Images:
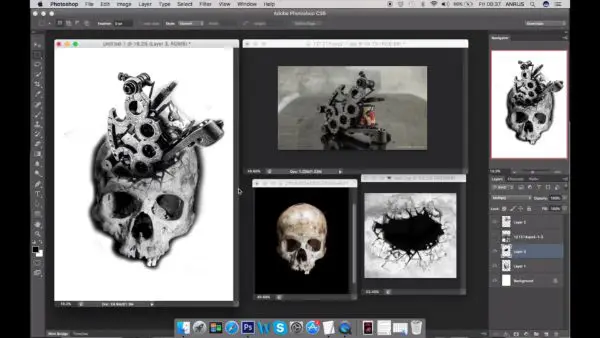
It is always convenient to select images which have a similar color story going on. For example, in this tutorial, the creator has selected a skull, a machine equivalent and an explosive hole. Now what is peculiar about these images is that all of them follow a similar dull color palette with greys in focus. However, do not worry if your images are of a different palette – we can always color tone them in Photoshop once your tattoo is ready.
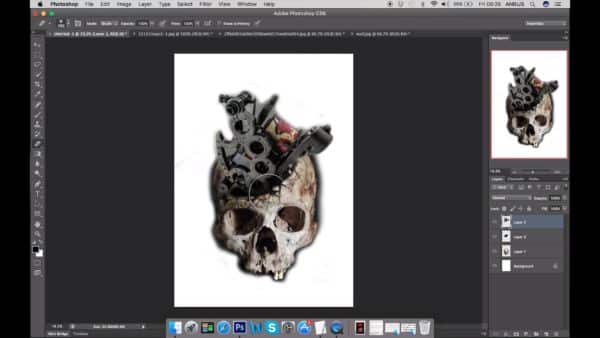
Step 2 – Placement of the Elements:

To begin with, open a blank A4 size canvas in Photoshop (A4 is ideal for giving a better quality image). Place the required base image. You can simply select the Eraser tool and erase the unwanted part of the image.
Now place the second image (Machine parts in this case) on top and follow the same process of eliminating the unnecessary parts using the Eraser tool. You can play with opacity and the sizes to achieve the most likely position placement of the elements.
Step 3 – Creating an Illusion:
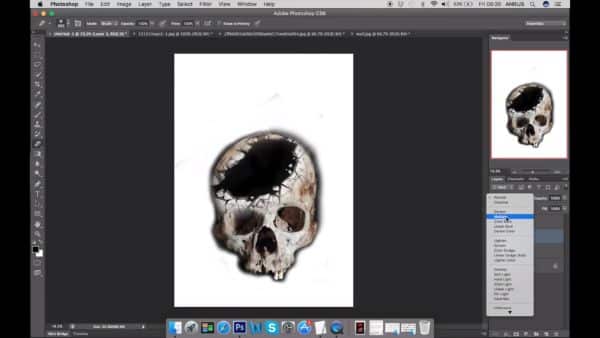
Most of the times, an illusion makes the tattoo look more 3D. By adding the right shadow effects, you can create the illusions. In this case, the creator wanted to show that the machines are coming out of the skull. In order to do so, he incorporated an additional element – the cracked up hole.
So place your illusion-creating image and again, eliminate the parts which you don’t want with an Eraser tool. To give an effect that the hole is actually in the skull, you can play with the blend mode. For this tutorial, the creator chose the Multiply mode, keeping the colors in mind. However, you can select and try out all the different modes for maximum effect.
Step 4 – Finalizing the Tattoo:
Now, as all the elements are in place, try to resize different images to make sure everything is in proportion. For example, the hole and the machines need to be in perfect proportion to the skull in order to look believable. Make sure that all elements are orderly placed on top of each other. Also, check opacity or other effects that you have applied.
Once you have made through this step and are satisfied with your design, you can choose to flatten the layers in order to reduce the size as well as just rasterizing the image as one. However, this step is optional if you wish to make further changes in your file.
Step 5- Final Effect:
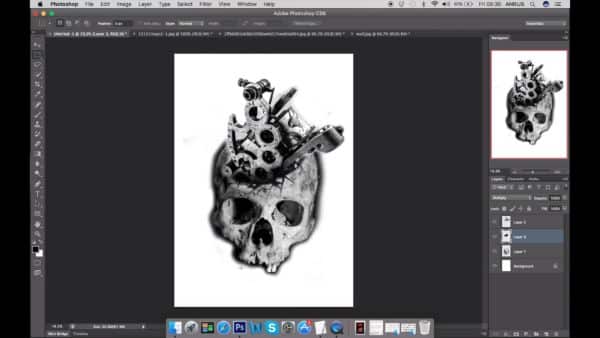
Most of the times, it may happen so that the images are all of a different color scheme. While sometimes it looks perfectly vibrant and colorful, usually it may come off as a bit off-tune. To avoid this issue, you can choose from various filters and effects that Photoshop provides – like Sketch tool, Blur tool, and many more under Filters.
However, for this tutorial, the creator has simply turned the image into greyscale and plays with the levels to show various tones of greyscale. Again, this step is optional in case you think that your design fits in perfectly.
So in this way, you can design your tattoos on Photoshop and easily give them to your tattoo artist to replicate and get inked. What’s more, this is the exact process followed by tattoo artists. Hence, you can even cut down on individual costs by designing your tattoo on Photoshop and giving it to them already.
2. How to Place a Tattoo in Photoshop:
Unlike the first tutorial, this part of the blog is more concerned with the use of Photoshop to edit tattoos on images. Herein, we would see a couple of ways to make the Photoshop-ed tattoos look more realistic and at the same time, easily changeable.
Method 1 – Erica Larson Method:
Step 1:
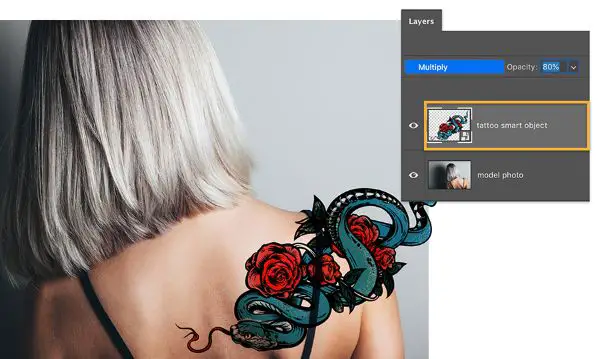
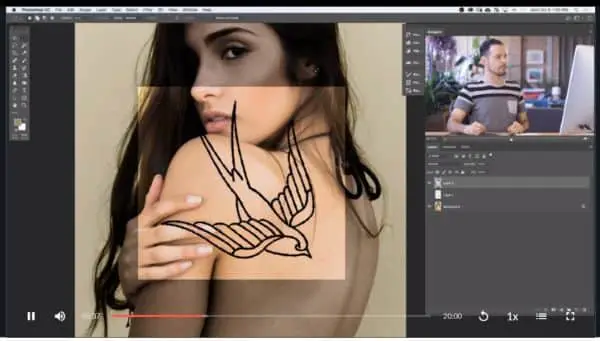
Open the image in Photoshop along with the tattoo composite that you wish to engrave on the body of the model. Place the tattoo in the required position and reduce the opacity to make it meld onto the shoulder. You can play with the Blend Mode – Larson chose to settle on Multiple.
Step 2:
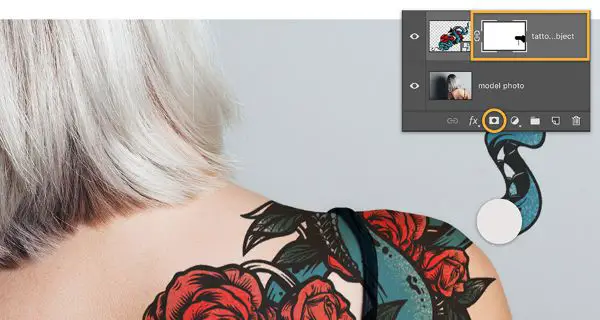
Secondly, create a layer mask by clicking the tiny icon at the bottom of the Layers panel. She painted the off shoulder areas using a Brush tool. In this process, you define the edges of the tattoo, and this is the step that mainly composes how your design would look when it is either half-hidden or in the dark.
Step 3:
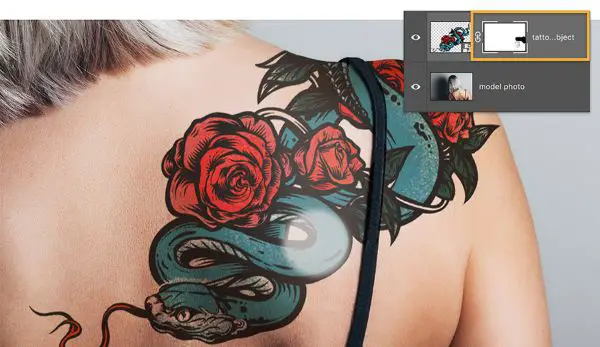
This step concerns the adjustment of lighting in the frame. It is a given that some areas of the tattoo would be highlights, while some could be in the dark. So to accomplish that effect, Larson chose to use the Brush tool with a lower opacity in the color black to highlight specific areas which could potentially have direct light exposure.
Step 4:
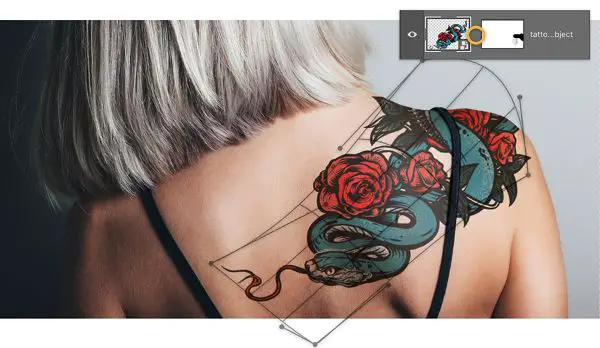
The tattoo won’t look natural unless it fits the contours of the model’s body frame. In order to do so, first, unlink the tattoo image from the mask layer. Now select the original tattoo thumbnail independent of the masked layer and press Control+T. You can also find the Transform function under Edit on the top menu bar. Press on Warp under Transform and drag the grid lines and edges in order to fit the curves of the body perfectly. You can warp the tattoo according to the body frame.
Step 5:
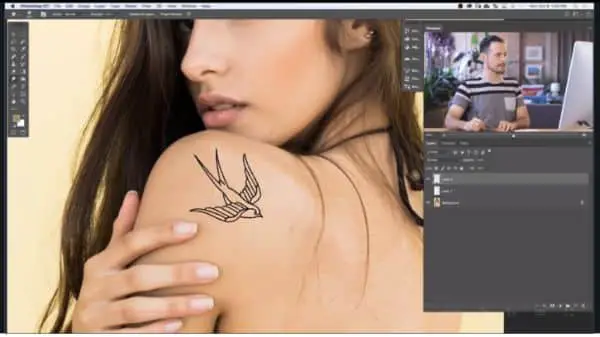
To make the tattoo look like it is closer to and on the skin, Larson chooses to blur the tattoo. For this, go to Filter and select the Blur tool, under which you can go for Gaussian Blur. Select the radius based on how blur you would want the tattoo to be. Remember to only apply this effect to the tattoo layer, and not the masked layer.
Voila! Your tattoo art is ready! You can experiment with this method to see how a tattoo can look on your skin or your client’s skin. This method is super-easy and shall not take more than 5-10 mins of your time once you are sure of the effect that you wish to foresee in the tattoo.
Method 2 – Various Effects to Keep in Mind:
This method primarily talks about the various effects that can be kept in mind while designing a tattoo and placing it on the model image to see if it works or not. With this particular tutorial, you can quickly learn how to make use of Filters, to give more natural effects to the tattoos. Design new and creative tattoos by implementing this as well.
Step 1- Hand-Made Look :
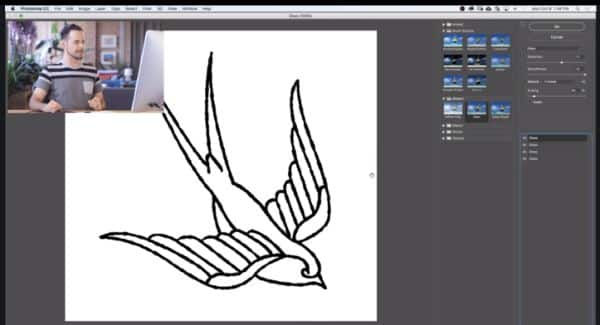
Most of the times, the lines and edges of stock images are too perfect for some given illustrations. To make it look a little uneven and give it that hand-drawn effect, here are a few ways techniques. Make sure you select a high-quality image so that the effects are correctly visible even when you scale down the image to any particular size.
Place the selected graphic on a plain white background. Use the Marquee tool to make a square around the graphic and just fill the square with white. Create a new layer under this tattoo image and merge these layers with Ctrl+E.
Begin the filter selection after the graphic has been placed on a white background. Select the Filter section on the top menu bar, go to Distort>Glass. There are various options like Smoothness, Scaling, Distort. Keep the smoothness filter to a high enough value in order to smooth out the edges and give them more natural-looking curves. You can then adjust the Distort and Scaling parameters to give a variant to the edges as per your image needs. You can redo this process with the Glass filter couple of times to achieve different variants. Once you are happy with the inference, you would see that the tattoo begins to appear more naturally hand-drawn than digitally illustrated.
STEP 2 – Channel Selection:
Once you are happy with the Filter, you need to cut the design from the white background. Fortunately, you can do this easily with the Channels option. Simple, you can go to the Channels setting above the Layers panel, select Blue Channel and click on the icon there using Alt or Option (For MAC). This shall easily select all the lighter areas in the image. Then simply inverse the selected area – by either Control+I or Select and Inverse. This shall convert all the light areas to the dark ones.
Now create a new layer. You would see that the Channel selection is active over this new layer at the top of the layer stack. Simply fill in the selection with black, and the tattoo design shall reappear. You can then use the Layer Mask to remove excess areas that could’ve been selected during the Channels step.
STEP 3 – Placing Tattoo on Skin:
This step is similar to the earlier tutorial. However, once you place the tattoo on the skin, we shall follow a different series of commands. You can simply use the Smudge tool and Liquify tool. This would allow you to push the design in the areas which require the design to be spread across. Additionally, the Smudge tool gives the illusion that the design is absorbed in the skin. Liquify shall help make changes in the direction and make the tattoo look like a part of the skin.
You can also add Bevel and Emboss layer style to the tattoo layer. Make sure you match the light direction first and then make the changes accordingly. As we saw in the previous tutorial, adding Gaussian blur also makes the tattoo look like it has been sitting on the skin for a while. You can select a suitable radius according to your design.
Rest of the steps can be followed according to the previous tutorial. You can also explore more effects within the Filters tab in order to give more hand-drawn effects. These are a few tips to remember while designing tattoos in Photoshop.